Introduction
Maintaining proper indoor humidity is essential for preserving structural integrity, preventing mold growth, and enhancing comfort. This guide explains how to install a central dehumidifier that connects to existing HVAC ducts, allowing the entire home to benefit from controlled moisture levels. Readers will learn how to assess the space, select appropriate equipment, perform the installation safely, and verify performance. By following the procedures, one can achieve reliable humidity control while minimizing energy consumption.
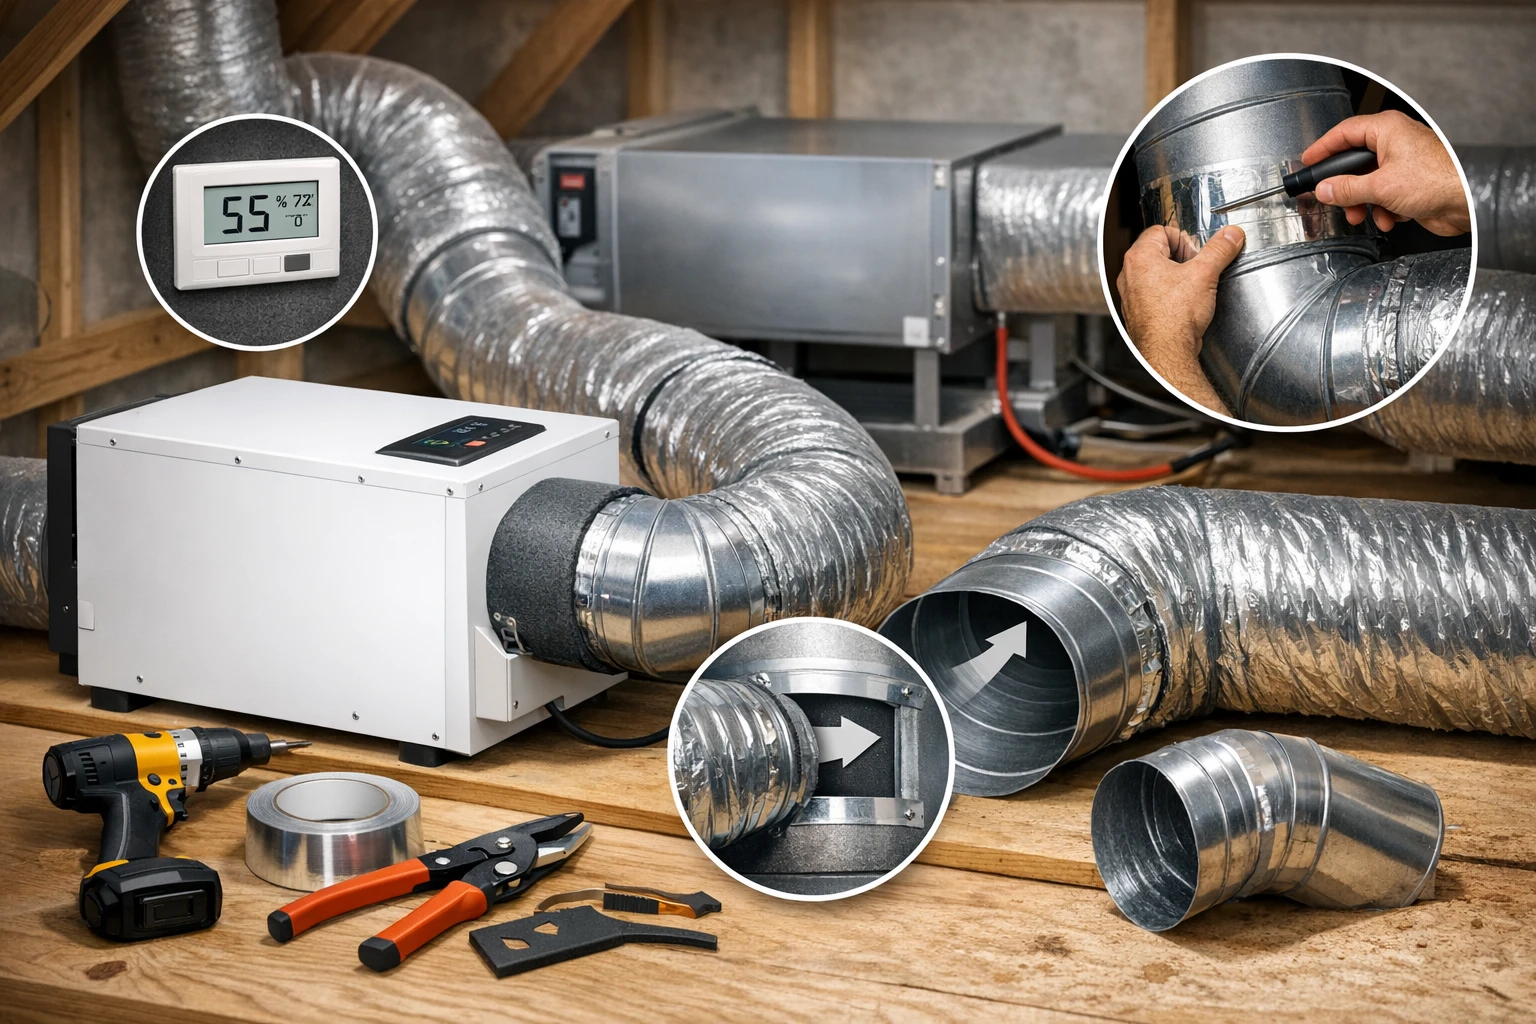
What You Will Need
- Central dehumidifier suitable for duct integration (e.g., ALORAIR Wi‑Fi 113‑Pint Crawlspace Dehumidifier or Waykar 158‑Pint Crawl Space Dehumidifier)
- Condensate removal pump (Little Giant VCMA‑15UL Condensate Pump)
- Wall‑mount humidity controller (Model 76 Wall Humidity Controller)
- Flexible ductwork, metal clamps, and insulation
- Basic hand tools, screwdriver set, and a drill
- HVAC hydraulic swaging tool kit for custom copper tubing connections (IBOSAD HVAC Hydraulic Swaging Tool Kit)
- Electrical wiring, conduit, and a dedicated circuit breaker
- Safety equipment: gloves, goggles, and a dust mask
Step 1 – Assess the HVAC System and Determine Capacity
Begin by evaluating the square footage of the conditioned area and the existing HVAC airflow. Use the rule of thumb that one pint of moisture removal per 1,000 ft² is required for moderate climates; more humid regions may need up to two pints per 1,000 ft². Calculate the required daily removal capacity and compare it with the specifications of the recommended dehumidifiers. The ALORAIR Wi‑Fi 113‑Pint Crawlspace Dehumidifier delivers 113 pints per day, is rated 4.1 stars, and costs $628.66, making it suitable for homes up to approximately 1,000 ft². The Waykar 158‑Pint Crawl Space Dehumidifier provides 158 pints per day, holds a 4.4‑star rating, and is priced at $589.99, covering larger spaces up to 1,500 ft². Selecting the appropriate unit ensures the system operates efficiently without excessive cycling.
Step 2 – Prepare the Installation Location
Identify a location near the main supply plenum where the dehumidifier can be mounted securely. The area should be level, have adequate clearance for service access, and be within 10 feet of a power outlet. Install a sturdy mounting platform using 2 × 4 lumber or a metal bracket, ensuring the unit’s weight (often 80–120 lb) is supported. For the ALORAIR model, the compact design permits placement in a crawlspace or utility closet, while the Waykar unit’s larger frame may require floor‑level installation. Verify that the location allows a straight duct run to minimize pressure loss.
Step 3 – Connect the Dehumidifier to the Ductwork
Measure the diameter of the dehumidifier’s outlet (typically 6‑inches) and cut the existing supply duct accordingly. Use flexible insulated duct to connect the unit to the supply plenum, sealing all joints with metal clamps and foil tape. The Waykar dehumidifier features a dual‑duct design, providing separate intake and exhaust paths; this improves airflow balance and reduces heat buildup. If custom copper tubing is required for refrigerant lines or condensate routing, the IBOSAD HVAC Hydraulic Swaging Tool Kit offers precise swaging of 3/8‑inch to 1‑5/8‑inch tubing, ensuring leak‑free connections. Proper swaging prevents future maintenance issues and maintains system efficiency.
Step 4 – Install the Condensate Removal System
Both dehumidifiers generate a continuous stream of water that must be removed to avoid overflow. The Little Giant VCMA‑15UL Condensate Pump provides a 65 GPH capacity, operates at 115 V, and includes a 1/2‑gallon holding tank. Connect the pump’s inlet to the dehumidifier’s drain outlet using a 3/8‑inch hose, and route the discharge hose to a floor drain or sump pit. The pump’s vertical‑type switch saves space, and its thermal overload protection ensures safe operation. Verify that the pump’s maximum lift (15 ft) exceeds the vertical distance to the drain; otherwise, consider a pump with higher head capability.
Step 5 – Wire the Unit and Add a Humidity Controller
Install a dedicated 120‑V circuit on a new breaker to supply the dehumidifier and pump. Follow local electrical codes, using appropriately sized wire (12‑AWG for 15 A circuits). Connect the dehumidifier’s power cord to the outlet, and route the pump’s cord through a conduit to protect it from moisture. For precise humidity regulation, replace the factory control with the Model 76 Wall Humidity Controller. This controller offers digital set‑point adjustment, a clear LCD display, and compatibility with April Aire models; however, it can also be used as a standalone controller for the recommended dehumidifiers when wired to the unit’s control terminals. Set the desired relative humidity (typically 45–55 %).
Step 6 – Test the System and Verify Performance
Power on the dehumidifier and allow it to run for at least one hour. Observe the airflow through the supply duct, confirming that air is moving without excessive noise. Use a calibrated hygrometer to measure the ambient relative humidity before and after operation; a reduction of 5–10 percentage points indicates proper function. Verify that the condensate pump activates when water accumulates and shuts off once the tank empties. Check the wall controller’s readout to ensure it reflects real‑time humidity levels. Adjust the set‑point if necessary, and document the operating parameters for future reference.
Tips & Pro Tips
- Seal all duct joints with foil tape to prevent air leakage, which can reduce dehumidification efficiency.
- Install a short length of insulated duct near the dehumidifier to protect the unit from condensation on cold surfaces.
- When using the Waykar unit, position the remote control panel within 32.8 feet of the unit for reliable wireless operation.
- Periodically clean the MERV‑1 filter on the ALORAIR model to maintain airflow and prolong motor life.
- Schedule quarterly maintenance checks of the condensate pump’s impeller and check valve to avoid blockages.
- If the dehumidifier includes an auto‑defrost feature, ensure the ambient temperature sensor is not obstructed by insulation.
Troubleshooting
Problem: Unit does not start.
Solution: Verify that the dedicated circuit breaker is on, confirm proper wiring to the control terminals, and check that the power outlet is delivering 120 V with a multimeter.
Problem: Excessive frost on the evaporator coil.
Solution: Ensure the auto‑defrost cycle is enabled (both ALORAIR and Waykar models include this feature). Increase the set‑point temperature by 2–3 °F or improve airflow around the unit.
Problem: Condensate pump runs continuously.
Solution: Inspect the float switch for debris, verify that the discharge hose is not kinked, and confirm that the pump’s shut‑off height is set correctly.
Conclusion
Integrating a central dehumidifier with HVAC ducts provides whole‑home moisture control, protects building materials, and enhances occupant comfort. By assessing capacity, preparing a secure mounting location, connecting ductwork, installing a reliable condensate pump, and adding a precise wall controller, one can achieve consistent humidity levels with minimal maintenance. The recommended products—ALORAIR Wi‑Fi 113‑Pint Crawlspace Dehumidifier, Waykar 158‑Pint Crawl Space Dehumidifier, Little Giant VCMA‑15UL Condensate Pump, Model 76 Wall Humidity Controller, and IBOSAD HVAC Hydraulic Swaging Tool Kit—offer proven performance, favorable ratings, and features that simplify the installation process.
Products Mentioned in This Guide
Frequently Asked Questions
What size central dehumidifier should I choose for my HVAC duct system?
Select a unit whose pint‑per‑day rating matches the square footage and moisture load of your home, typically 1 pint per 500 sq ft for moderate climates.
Can I install a central dehumidifier myself, or do I need a professional?
Basic DIY installation is possible if you are comfortable working with ductwork and electrical connections, but a licensed HVAC technician is recommended for code compliance and safety.
How does a condensate removal pump work with a central dehumidifier?
The pump collects water from the dehumidifier’s drain pan and automatically pumps it to a floor drain or outside, preventing overflow and allowing continuous operation.
Where should the wall‑mount humidity controller be placed for optimal performance?
Mount the controller in a central, open area away from direct sunlight, drafts, or moisture sources to ensure accurate humidity readings.
What maintenance steps are required after installing a central dehumidifier?
Regularly clean the air filter, inspect the condensate pump, and verify the humidity setpoint to keep the system running efficiently.