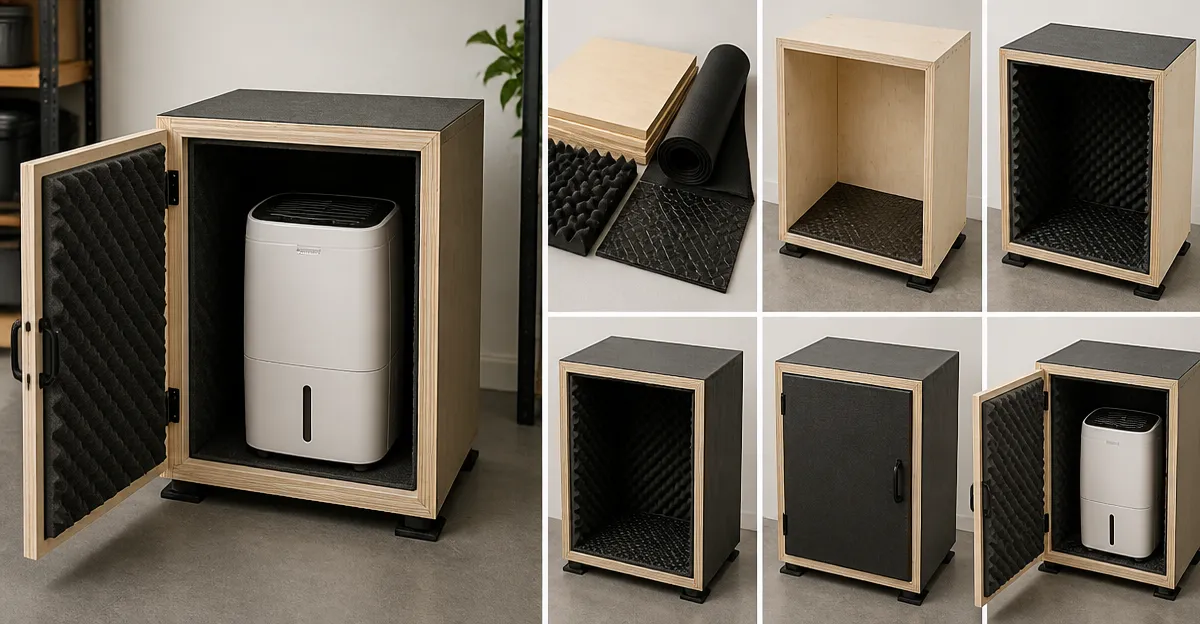
Introduction
In this guide the reader will learn how to design and construct an acoustic enclosure for a residential dehumidifier. The enclosure will reduce operational noise while preserving airflow and moisture‑removal efficiency. By following the step‑by‑step instructions one can achieve a professional result without specialized tools. The information provided is valuable for homeowners, renters, and small‑business operators who seek a quieter indoor environment.
What You'll Need
- 1×8 ft sheet of TroyStudio Mass Loaded Vinyl (price $33.99, rating 4.1/5)
- Four 12‑in high‑density acoustic panels from BSHEAD Acoustic Panel (price $19.97 each, rating 4.4/5)
- One roll of VOISEN Car Sound Deadener (price $24.99, rating 4.4/5)
- Wooden 2×4 lumber for the frame, screws, wood glue, and a drill
- Acoustic caulk or barrier tape for sealing seams
- Utility knife, measuring tape, and safety glasses
Step 1: Plan the Enclosure Dimensions
The first major step is to measure the dehumidifier and determine the required interior volume. One should allow at least two inches of clearance on all sides to maintain adequate airflow. Sketch a rectangular box that is three inches taller than the unit to accommodate the sound‑absorbing layers. Record the dimensions in centimeters for precise cutting of the mass loaded vinyl and acoustic panels.
Step 2: Build the Wooden Frame
Cut the 2×4 lumber to the lengths indicated in the sketch, then assemble a rectangular frame using wood glue and screws. Secure the corners with metal brackets for added rigidity. The frame will support the mass loaded vinyl and acoustic panels without warping. Ensure that the frame is level and that all joints are flush; this will prevent acoustic leaks later in the process.
Step 3: Apply Vibration‑Damping Material
Before installing the mass loaded vinyl, line the interior of the frame with the VOISEN Car Sound Deadener. This product provides a waterproof aluminum surface that adheres easily to wood and absorbs low‑frequency vibrations generated by the compressor. Cut the 197 mil (5 mm) mats to fit the sides of the frame, then press them firmly to eliminate air pockets. The deadening layer reduces structure‑borne noise that would otherwise travel through the floor and walls.
Step 4: Install Mass Loaded Vinyl
Next, attach the TroyStudio Mass Loaded Vinyl to the interior surfaces of the frame. This material has an area density of one pound per square foot and a high STC rating of 28, making it ideal for adding mass without excessive thickness. Apply a construction adhesive evenly across the back of the vinyl, then press it onto the wood surface. Use roofing nails or screws at the studs to secure the edges, and seal all seams with acoustic caulk or barrier tape to prevent sound leaks.
Step 5: Add Acoustic Panels
Cover the exterior of the enclosure with the BSHEAD Acoustic Panel. These 12‑inch high‑density panels are made of 100 % polyester, are flame‑retardant, and provide superior sound absorption due to their increased thickness and density. Attach the panels using the self‑adhesive backing; the removable tape allows future adjustments without damaging the enclosure. Arrange the panels in a decorative pattern that also maximizes coverage, aiming for at least 80 % surface coverage to achieve optimal acoustic performance.
Step 6: Seal and Finish the Enclosure
After all layers are installed, seal the edges of the enclosure with acoustic caulk to eliminate any remaining gaps. Apply a thin layer of paint or a decorative veneer if aesthetic integration with the room is desired. Verify that the dehumidifier’s intake and exhaust vents remain unobstructed; install vent grills if necessary. Finally, place the dehumidifier inside the enclosure, reconnect the power, and observe the reduction in perceived noise.
Tips & Pro Tips
- Measure twice and cut once; precise cuts reduce material waste and ensure a tight fit.
- When using the mass loaded vinyl, overlap seams by at least one inch and seal with acoustic tape.
- For maximum vibration control, combine the VOISEN deadener with rubber isolation pads beneath the dehumidifier.
- Test the enclosure at low fan speed before running the unit at full capacity to ensure adequate airflow.
- Consider adding a small vent fan with a low‑noise rating if the enclosure becomes too warm during extended operation.
Troubleshooting
Problem: The dehumidifier feels excessively hot.
Solution: Verify that intake and exhaust vents are not blocked; add additional vent grills or a low‑speed exhaust fan.
Problem: Noise reduction is insufficient.
Solution: Inspect all seams for gaps; apply additional acoustic caulk and consider adding a second layer of mass loaded vinyl.
Conclusion
By following this guide one can construct a durable, aesthetically pleasing acoustic enclosure that dramatically reduces dehumidifier noise. The combination of vibration‑damping mats, mass loaded vinyl, and high‑density acoustic panels provides a multi‑layered approach to sound control. The reader is encouraged to apply these principles to other household appliances that generate unwanted noise.
Products Mentioned in This Guide
Frequently Asked Questions
What materials are required to build a DIY acoustic enclosure for a dehumidifier?
You need mass loaded vinyl, high‑density acoustic panels, car sound deadener, 2×4 lumber, screws, wood glue, a drill, and acoustic caulk or barrier tape.
How does mass loaded vinyl help reduce dehumidifier noise?
Mass loaded vinyl adds density and damping, absorbing sound vibrations before they escape the enclosure.
Can I maintain proper airflow while using an acoustic enclosure?
Yes, design vent openings and use perforated acoustic panels to allow air circulation without sacrificing sound reduction.
Do I need special tools to construct the enclosure?
No special tools are needed; a standard drill, saw, and basic hand tools are sufficient.
Will the enclosure affect the dehumidifier’s moisture‑removal performance?
If sized correctly with adequate vents, the enclosure preserves airflow and moisture‑removal efficiency while lowering noise.