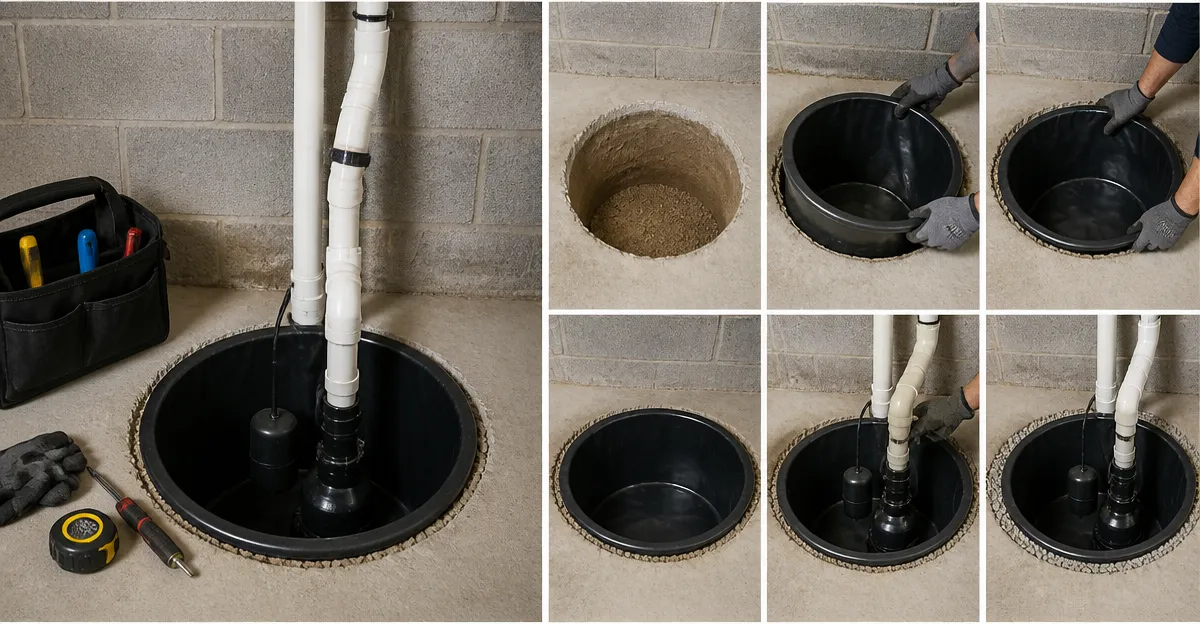
How to Install a Sump Pit Liner in a Masonry Basement: Step‑by‑Step DIY Guide
Introduction
Basement flooding can cause extensive structural damage, mold growth, and costly repairs. Installing a properly sealed sump pit liner mitigates water intrusion by directing groundwater to a pump that discharges it away from the foundation. This guide explains the entire process, from assessing the basement floor to testing the finished system. By following each step, a homeowner can achieve a reliable drainage solution without the need for professional excavation services.
The information presented is based on industry best practices and includes product recommendations that simplify the installation. While the guide is comprehensive, the reader may choose alternative tools if preferred; the recommended items are selected for their durability, ease of use, and compatibility with typical masonry basements.
What You’ll Need
- Measuring tape, level, and chalk line for layout
- Rotary hammer with masonry drill bits
- Shovel and wheelbarrow for excavated material
- Compactable stone or crushed gravel for the base layer
- Water‑proof sealant or hydraulic cement
- Submersible sump pump (not included in this guide)
- One of the following sump pit liners, selected according to pit size and space constraints:
- Skdqiee Perforated Sump Basin – $85.99, 40 pre‑drilled holes, compact 13×11×15 in dimensions.
- Setharyrr Heavy Duty Sump Basin – $234.99, 18 in diameter, 22 in deep, HDPE construction.
- Memorywuu Perforated Sump Basin – $84.54, 40 holes, 15×13×11.5 in, 4.6‑star rating.
- Mutual Industries Sump Pit – $— (price not listed), 19×24 in liner, high‑density polyethylene.
- Optional cover for the pit:
- Zoeller Sump Basin Cover – $75.69, polymer construction, 4.1‑star rating.
Step 1: Assess the Basement Floor and Determine Pit Location
The first task is to identify the lowest point of the slab where water accumulates. Use a level and a small amount of water to confirm the natural collection area. Verify that the chosen location provides access for a discharge pipe that can exit the foundation wall without obstruction. Avoid placing the pit directly beneath load‑bearing walls or utility lines.
Mark the perimeter of the pit with a chalk line, allowing a clearance of at least two inches from adjacent walls to facilitate backfill. This step ensures accurate excavation and prevents future structural conflicts.
Step 2: Gather Tools and Verify Materials
Before commencing excavation, assemble all required tools and confirm that the selected liner matches the planned pit dimensions. For a compact crawl‑space application, the Skdqiee Perforated Sump Basin offers a space‑saving profile while providing 40 pre‑drilled holes for rapid groundwater entry. For larger basements, the Setharyrr Heavy Duty Sump Basin delivers a deeper volume and HDPE durability, reducing the risk of deformation under backfill pressure.
Inspect each product for visible damage. Verify that the lid openings align with the intended pipe diameter, typically 1.5 to 2 inches. Confirm that the sealant and backfill material are appropriate for masonry environments.
Step 3: Excavate the Pit
Using a rotary hammer with a masonry bit, cut a rectangular or circular opening according to the liner dimensions. For the Skdqiee Perforated Sump Basin, the opening should be slightly larger than 13×11 in to allow placement of the basin and a few centimeters of stone base. For the Setharyrr Heavy Duty Sump Basin, excavate a 19–20 in diameter hole with a depth of 22–24 in to accommodate the 18 in diameter, 22 in deep basin.
Remove all loose debris and ensure the walls of the pit are smooth to prevent damage to the liner during placement. If the excavation encounters reinforced concrete, cut carefully to avoid compromising structural integrity.
Step 4: Prepare the Base Layer
Lay a 2–3 in layer of washed stone or crushed gravel at the bottom of the pit. This layer promotes drainage and provides a stable platform for the liner. Compact the stone with a hand tamper to eliminate voids that could cause uneven settling.
For basements with high water tables, consider adding a thin layer of hydraulic cement over the stone to create a water‑tight seal between the masonry and the liner. This step is optional but enhances long‑term performance.
Step 5: Install the Sump Pit Liner
Place the selected liner gently onto the prepared stone bed. Align the lid openings with the pre‑planned pipe penetrations. The Memorywuu Perforated Sump Basin features two 1.7 in lid holes, making it compatible with standard 1.5‑in discharge pipes without additional drilling.
If using the Mutual Industries Sump Pit, note that the liner does not include pre‑drilled weep holes. Drill approximately twenty 3/8 in holes in the lower six inches of the sidewall to allow groundwater entry, as recommended by the manufacturer. This modification prevents the liner from floating when water surrounds it.
Check that the basin sits level in all directions. Use a level to verify that the rim is flush with the surrounding masonry, which will simplify backfilling and lid installation.
Step 6: Connect the Pump and Discharge Pipe
Insert the submersible pump into the basin, ensuring the intake is positioned above the stone base to avoid sediment blockage. If the basin includes a built‑in weep hole pattern, the pump will receive water naturally; otherwise, verify that the drilled weep holes are clear.
Route the discharge pipe through the lid opening. The Skdqiee Perforated Sump Basin provides two 1.8 in openings, which accommodate most residential pump discharge diameters. Secure the pipe with a waterproof sealant to prevent leakage at the penetration point.
Step 7: Backfill and Finish the Installation
Backfill the pit with a mixture of sand and small gravel, placing the material in 2 in increments and compacting each layer. This approach prevents void formation and supports the liner against external pressure. Continue backfilling until the surrounding masonry is level with the rim of the liner.
If a dedicated cover is desired, install the Zoeller Sump Basin Cover. The polymer cover fits an 18 in diameter opening, provides a weather‑proof seal, and resists corrosion. Apply a bead of silicone caulk around the perimeter before setting the cover to ensure a watertight seal.
Step 8: Test the System
Fill the pit with water to a level slightly above the pump intake. Observe the pump activation, verify that water is discharged through the pipe, and check for any leaks around the lid penetration. Run the pump for several minutes to ensure that the float switch operates correctly and that the basin does not shift under load.
After testing, clean the work area and store any excess tools. Document the installation details, including pit depth and liner model, for future reference or maintenance.
Tips & Pro Tips
- When working in a confined crawl space, use a compact liner such as the Skdqiee Perforated Sump Basin to reduce excavation effort.
- Apply a rust‑inhibiting primer to any metal fasteners used near the pit to prevent corrosion.
- Consider installing a check valve on the discharge line to prevent backflow during power outages. \n
- For basements with high humidity, seal the surrounding masonry with a waterproofing membrane before backfilling.
- Periodically inspect the weep holes for blockage by soil or debris; clear them to maintain optimal water entry.
Troubleshooting
| Problem | Possible Cause | Solution |
|---|---|---|
| Pump does not start | Float switch stuck or water level below activation point | Raise water level, clean float switch, ensure power supply is active |
| Water leaks around lid opening | Improper sealant or misaligned pipe | Reapply silicone caulk, verify pipe is centered, tighten any clamps |
| Liner shifts after backfill | Insufficient stone base or uneven compaction | Remove backfill, add additional stone, compact each layer thoroughly |
Conclusion
Installing a sump pit liner in a masonry basement is a manageable DIY project when the homeowner follows a systematic approach. By assessing the site, selecting an appropriate liner such as the Setharyrr Heavy Duty Sump Basin, and adhering to the excavation, placement, and testing steps, one can achieve a durable drainage solution that protects the home from water damage. Regular maintenance and periodic inspection will ensure continued performance for years to come.
Products Mentioned in This Guide
Frequently Asked Questions
What is the purpose of a sump pit liner in a masonry basement?
It creates a sealed chamber that collects groundwater and directs it to a pump, preventing flooding and water damage.
How do I determine the correct size of a sump pit liner for my basement?
Measure the available floor space and select a liner that fits while leaving at least 12 inches of clearance around the edges for backfill.
What tools are essential for cutting through masonry when installing a sump pit liner?
A rotary hammer with masonry drill bits, plus a measuring tape, level, and chalk line, are required.
How should I prepare the base before placing the sump pit liner?
Lay a 2‑4 inch layer of compactable stone or crushed gravel to provide a stable, draining foundation.
How can I test the sump pit system after installation?
Fill the pit with water to the pump’s float level and verify that the pump activates and discharges water away from the foundation.