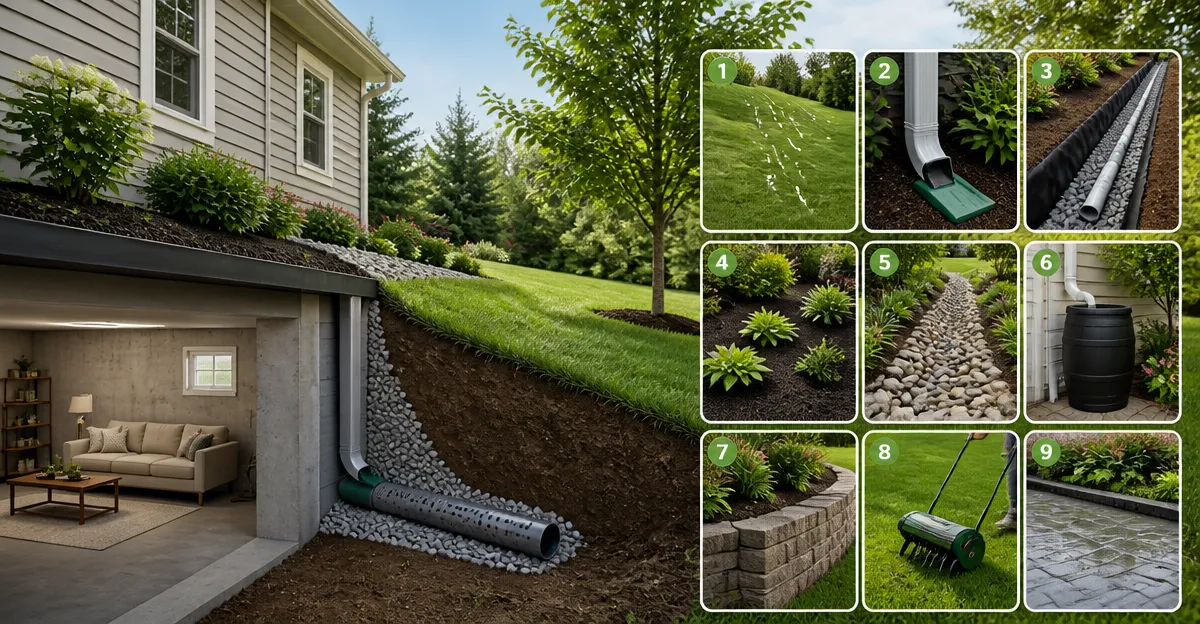
How to Reduce Basement Humidity with Landscaping: 9 DIY Strategies to Keep Your Basement Dry
Introduction
High humidity in a basement often originates from water that infiltrates the foundation through poorly graded soil, inadequate drainage, or clogged gutters. This guide teaches readers nine practical landscaping techniques that divert water away from the home, improve soil moisture balance, and ultimately create a drier, healthier basement environment. By following each step, homeowners will gain confidence in assessing site conditions, installing effective drainage solutions, and maintaining the landscape to prevent future moisture problems. The information is presented in a professional tone, with clear explanations and actionable advice, so both novice and intermediate DIYers can achieve reliable results.
What You’ll Need
- Measuring tape, level, and shovel
- Landscape fabric and gravel
- Tools for cutting plastic (utility knife or scissors)
- Optional products for enhanced performance:
Step 1: Evaluate Site Grading
The first task is to determine whether the ground slopes away from the foundation. Use a level and a 10‑foot straightedge to measure the slope; a minimum drop of 6 inches per 10 feet is recommended. If the grading is insufficient, the soil will channel rainwater toward the basement walls, increasing humidity. Identify low spots and high spots, and mark them with spray paint. This assessment informs where additional grading or drainage components are required. Proper grading creates a passive barrier that reduces the volume of water reaching the foundation.
Step 2: Regrade the Landscape
After the evaluation, add or remove soil to achieve the desired slope. Spread a layer of coarse sand or clean fill material to fill depressions, then compact it with a plate compactor. Extend the slope outward for at least 10 feet from the foundation, ensuring water flows toward the yard or a designated drainage area. Regrading is a low‑cost, high‑impact measure that works in conjunction with other strategies. Remember to maintain the slope after planting, as heavy mulch can flatten the surface over time.
Step 3: Install a Surface Drainage System
Surface drains capture runoff before it reaches the foundation. The URA Water Channel Drain is an ideal tool for this purpose because its low‑profile design fits discreetly in driveways, patios, and walkways. Each channel measures 5 inches wide, 3 inches high, and 39 inches long, and the three‑pack provides a total length of 117 inches, sufficient for most residential front‑yard applications. The interlocking connections enable quick installation without screws, while the anti‑flotation feet keep the channel stable during concrete pours. By positioning the channel drain at the lowest point of the regraded slope, water is directed toward a catch‑basin or downspout extension.
Step 4: Extend Downspouts Away from the Foundation
Even with proper grading, roof runoff that discharges directly at the foot of the house can saturate the soil near the foundation. Extending downspouts ensures that water is deposited at a safe distance, typically 6 to 10 feet away. The YOTODY Downspout Extensions provide a flexible, leak‑proof solution that can be buried or laid on the surface. Each extension extends from 1.34 feet to 5.1 feet, allowing homeowners to customize the discharge point. The corrugated design resists cracking and can be bent to navigate obstacles, while the built‑in catch basin prevents splashing and directs water into a designated drainage zone. Installing these extensions eliminates the need for deep excavation and reduces labor costs.
Step 5: Install an Underground French Drain
For properties with persistent moisture, an underground French drain offers superior protection. The French Drain Man Kit supplies all components required for a complete system, including a 19‑foot coil of 3½‑inch high‑octane corrugated pipe, a vented clean‑out leaf filter, a pop‑up emitter, a catch basin, and waterproof tape for watertight joints. The 3½‑inch pipe is easier to install than larger diameters, requiring a shallower trench while still providing ample flow capacity. The kit’s all‑in‑one packaging eliminates the need to source individual parts, saving time and ensuring compatibility. Position the trench at the perimeter of the foundation, lay the pipe with a consistent 1% slope, cover with gravel, and backfill with soil.
Step 6: Provide a Final Discharge Point
After the underground pipe transports water away from the house, a controlled discharge point prevents erosion and pooling. The Hualinsyi Yard Drain Emitter integrates a 4‑inch connector with a sturdy grate, allowing water to exit onto a landscaped area or a dry well. Its 0.24‑inch wall thickness and ABS construction ensure durability under traffic and weather exposure. The emitter’s angled design matches the natural slope of the yard, facilitating smooth flow while the stainless‑steel screws enable easy removal for cleaning. Installing this emitter at the low end of the French drain completes the water‑management loop.
Step 7: Apply Landscape Fabric and Gravel
To further inhibit moisture migration, line the trench beneath the French drain with landscape fabric before adding gravel. The fabric prevents soil from infiltrating the gravel layer, preserving the pipe’s capacity to convey water. Spread a 2‑inch layer of washed gravel on top of the fabric; this acts as a filter and disperses water evenly. The combination of fabric and gravel extends the lifespan of the drainage system by reducing clogging and maintaining consistent flow rates.
Step 8: Plant Moisture‑Absorbing Vegetation
Strategically placed plants can absorb excess water and improve soil structure. Choose deep‑rooted, native species such as switchgrass, ornamental grasses, or prairie coneflower, which draw water from the root zone and promote aeration. Avoid dense, shallow‑rooted lawns near the foundation, as they can retain moisture against the walls. Mulch with coarse bark or wood chips to further increase infiltration while suppressing weeds. Proper planting not only enhances curb appeal but also serves as a living component of the drainage system.
Step 9: Maintain the System
Regular maintenance ensures long‑term effectiveness. Inspect gutters, downspout extensions, and surface drains after major storms for blockages or damage. Clean the URA Water Channel Drain grates by hand—no tools are required—removing leaves and debris that could impede flow. Flush the French drain system annually with a garden hose to clear sediment, and verify that the yard drain emitter remains unobstructed. Prompt repairs prevent minor issues from escalating into costly foundation damage.
Tips & Pro Tips
- When regrading, compact soil in 2‑inch layers to avoid future settling.
- Use a laser level for precise slope measurement, especially on longer runs.
- Install a check valve in the downspout extension if local codes require backflow prevention.
- Consider adding a dry well at the end of the French drain to disperse water over a larger area.
- Schedule a professional inspection of the foundation after completing the landscaping work to confirm that humidity levels have decreased.
Troubleshooting
Problem: Basement remains damp despite completed drainage. Solution: Verify that the surface grading truly directs water away from the foundation; a subtle reversal can negate all other measures. Check for underground leaks from plumbing fixtures, which may require a pressure test.
Problem: Water pools near the yard drain emitter. Solution: Ensure the emitter is installed at the lowest point of the surrounding terrain and that the underlying gravel is not compacted. Re‑grade the immediate area if necessary.
Conclusion
By assessing site grading, installing surface and underground drainage, extending downspouts, and integrating landscape elements, homeowners can dramatically reduce basement humidity. Each of the nine strategies works synergistically, creating a comprehensive water‑management system that protects the foundation, improves indoor air quality, and enhances the overall value of the property. Implement the steps at a comfortable pace, monitor results, and adjust as needed to maintain a dry, healthy basement for years to come.
Products Mentioned in This Guide
Frequently Asked Questions
How does proper soil grading prevent basement humidity?
Grading slopes the soil away from the foundation, directing rainwater runoff outward instead of pooling against the walls.
What is the role of a French drain in basement moisture control?
A French drain collects and channels groundwater away from the house, reducing hydrostatic pressure on the foundation.
Why should gutters and downspouts be maintained for a dry basement?
Clean, correctly sized gutters and downspouts discharge roof water far from the foundation, preventing seepage into the basement.
Can landscape fabric and gravel improve drainage around a home?
Yes, fabric blocks soil intrusion while gravel creates voids for water to flow freely, enhancing overall site drainage.
What simple DIY step can I take if my basement still feels damp after landscaping?
Install a sump pump or interior drain to actively remove any residual moisture that penetrates the foundation.