How to Conduct Forensic Basement Moisture Monitoring for Insurance Claims: Step‑by‑Step Guide to Detection, Documentation and Data Logging
Introduction
The purpose of this guide is to enable homeowners, adjusters, and forensic investigators to perform a thorough moisture assessment of a basement. One will learn how to identify hidden water intrusion, record accurate measurements, and preserve evidence for insurance claim purposes. Accurate data collection reduces disputes, supports claim legitimacy, and protects property owners from future damage. The methodology described combines industry‑standard practices with reliable consumer‑grade tools that are readily available on Amazon.
What You Will Need
- Pinless moisture meter for non‑destructive wood and masonry readings
- Battery‑powered water alarm sensors for real‑time leak detection
- Smart leak detectors with long‑range connectivity for data logging
- Digital camera or smartphone with high‑resolution capability
- Measuring tape, notebook, and waterproof marker
- Protective gloves, boots, and flashlights
All recommended electronic tools are linked below for convenient purchase.
Step 1: Prepare the Inspection Area
Begin by clearing the basement floor of debris, stored items, and any loose insulation. This ensures unobstructed access to walls, joists, and foundation seams. Conduct a visual sweep for obvious water stains, efflorescence, or mold growth. Document the initial condition with photographs taken from multiple angles. Use a digital camera or a smartphone; ensure each image includes a scale reference such as a measuring tape.
At this stage, it is advisable to install a Topvico Water Alarm Sensors package in locations where water may accumulate, such as near the sump pump discharge and the water heater. Each sensor features a 120 dB alarm, high‑sensitivity 24K plated detection board, and a 37.8‑inch cable that can be extended for hard‑to‑reach spots. Priced at $22.89 with a 4.4‑star rating from 305 reviews, these sensors provide immediate audible alerts should a hidden leak become active during the inspection.
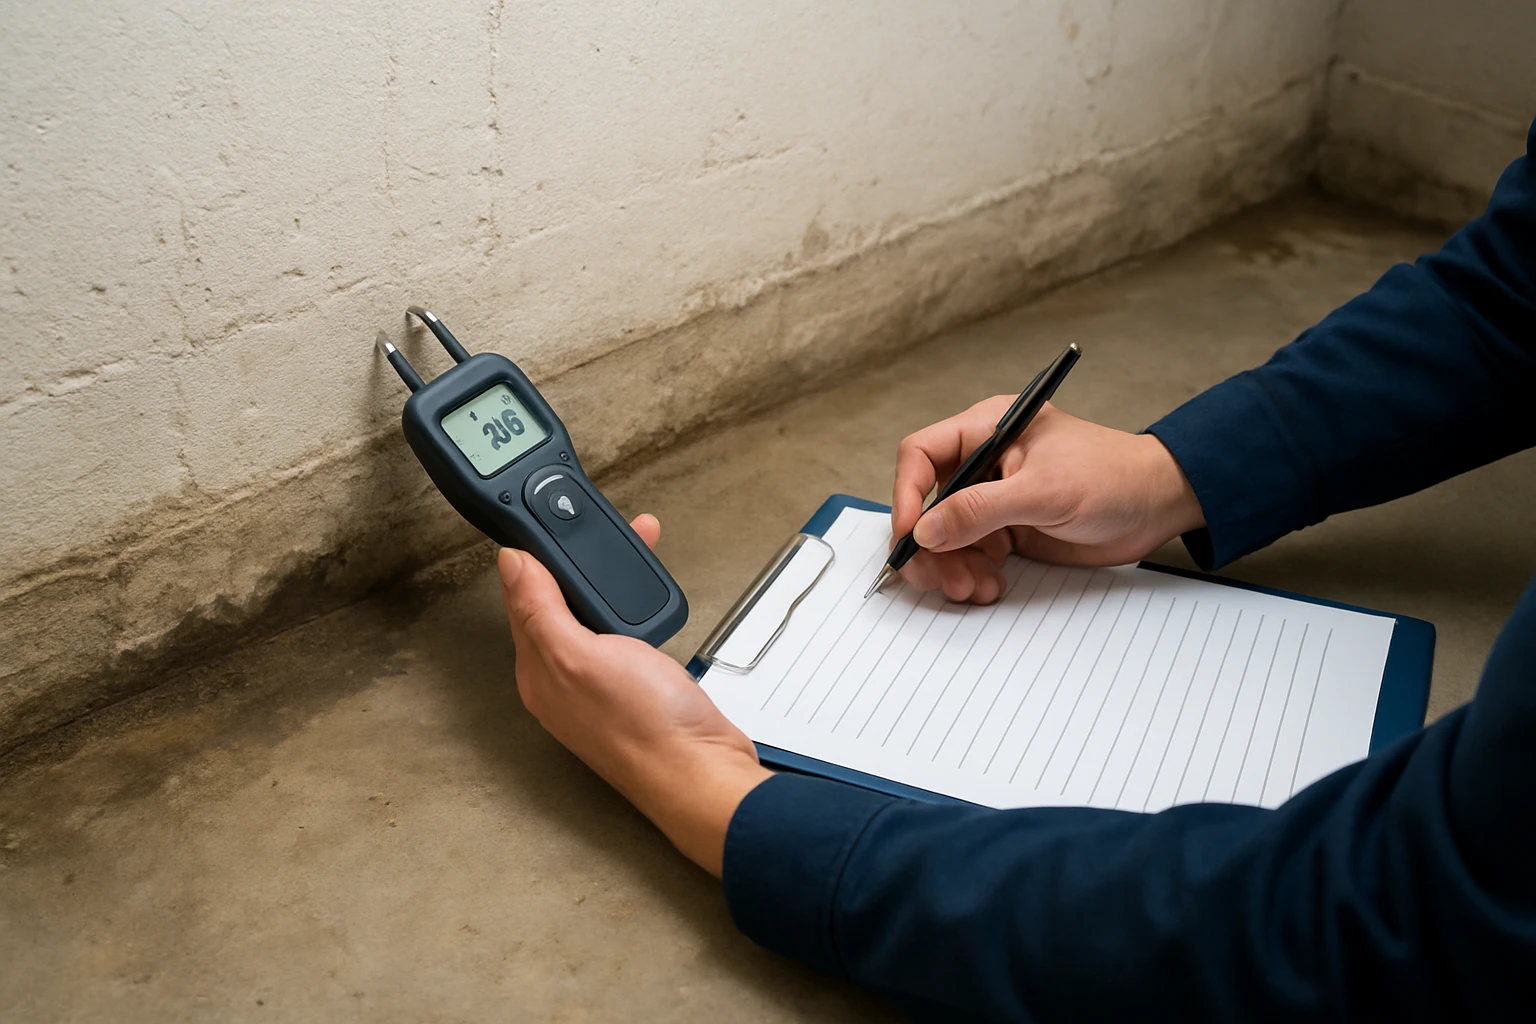
Step 2: Conduct Pinless Moisture Mapping
Using a non‑destructive moisture meter allows you to scan large surface areas without damaging finished walls or flooring. The Mecurate Pinless Moisture Meter offers four selectable modes (softwood, hardwood, wall, masonry) and nine density settings for precise calibration. Its 0.1 % resolution and backlit LCD display enable quick interpretation of moisture levels, while the three‑colored LED bar provides a visual cue for low, medium, and high moisture zones.
Set the meter to the appropriate mode for the material being examined. For concrete walls, select the “Wall” mode; for wooden joists, choose “Softwood” or “Hardwood” as required. Move the device slowly across each surface, pausing at regular intervals (approximately every 12 inches) to record the displayed percentage. Record the data in a tabular format, noting location, material, mode, and reading. The meter’s audible alert assists in identifying sudden spikes that may indicate localized water ingress.
Key specifications of the Mecurate meter include a price of $28.99, a 4.3‑star rating from 675 reviews, and inclusion of a carrying bag and three AAA batteries for immediate use. The pinless technology prevents surface damage, which is essential when documenting evidence for an insurance adjuster.
Step 3: Deploy Smart Leak Detectors for Continuous Monitoring
While point‑in‑time measurements are valuable, insurers often require evidence of ongoing moisture conditions. The GoveeLife Smart Leak Detectors provide ultra‑long‑range connectivity (up to 1804 ft) and real‑time notifications via SMS, email, and app push alerts. Each sensor operates on a 5‑year battery, reducing maintenance overhead during the claim period.
Place one detector at each critical location identified in Step 2: near the foundation wall with the highest moisture reading, adjacent to the sump pump, and in the lowest point of the basement floor. Use the companion app to configure alarm volume (four levels, up to 105 dB) and to enable one‑tap alarm silencing when the alert is acknowledged. The app also logs timestamps for each activation, creating a chronological record that can be exported for claim documentation.
The GoveeLife system is priced at $54.99 for a three‑pack and holds a 4.4‑star rating from 2,059 reviews. Its IP67 waterproof rating ensures durability even if the sensor becomes submerged during a flood event.
Step 4: Document Findings Systematically
Accurate documentation is the cornerstone of a successful insurance claim. Compile the moisture readings, sensor activation logs, and photographic evidence into a single report. Structure the report with the following sections: Executive Summary, Inspection Methodology, Measured Moisture Levels, Sensor Log Summary, Photographic Appendix, and Recommendations for Remediation.
For each measurement, include the following details: location (room, wall, joist), material type, meter mode, density setting, percentage reading, and date/time of measurement. Use a spreadsheet to calculate average moisture levels for each material category; this statistical overview helps demonstrate the extent of water intrusion.
When referencing sensor data, export the log from the GoveeLife app as a CSV file. Highlight any alarms triggered during the inspection period, noting the exact timestamp and sensor location. Pair each alarm entry with a corresponding photograph taken at the time of the event to provide visual corroboration.
Step 5: Preserve Evidence for the Adjuster
Insurance adjusters often request physical evidence in addition to digital records. Print the moisture table and sensor logs on high‑quality paper, and bind them with a clear plastic sleeve. Include a USB drive containing all photographs, raw sensor data files, and the full PDF report. Label each item clearly to facilitate quick review.
It is prudent to retain a copy of the entire dossier for personal records. Store the backup in a fire‑proof safe or a secure cloud storage service. Maintaining an organized archive ensures that any future disputes can be resolved with minimal friction.
Tips & Pro Tips
- Calibrate the pinless moisture meter before each use by following the manufacturer’s zero‑point procedure; this improves measurement reliability.
- Place water alarm sensors at least six inches above the floor to avoid false alarms from minor condensation.
- When using the smart leak detectors, verify that the Wi‑Fi network operates on the 2.4 GHz band; the devices do not support 5 GHz connections.
- Document ambient temperature and relative humidity at the time of measurement, as these factors influence moisture readings.
- Consider employing a moisture‑resistant marker to annotate walls directly after scanning; this visual aid assists the adjuster during an on‑site visit.
Troubleshooting
Problem: The pinless moisture meter displays erratic readings.
Solution: Ensure the device is held flat against the surface and that the backlit LCD is not reflecting ambient light. Replace the AAA batteries if the display appears dim.
Problem: Smart leak detector fails to connect to Wi‑Fi.
Solution: Reset the device by holding the reset button for ten seconds, then re‑enter the Wi‑Fi credentials. Verify that the router’s DHCP server is active and that the device is within range of the router.
Problem: Water alarm sensor does not trigger audible alert.
Solution: Check that the 9 V battery is installed correctly and has sufficient charge. Test the alarm by manually applying a few drops of water to the detection board.
Conclusion
This guide has outlined a systematic approach to forensic basement moisture monitoring for insurance claims. By preparing the site, employing a pinless moisture meter, installing water alarm sensors, and leveraging smart leak detectors for continuous data logging, one can produce a comprehensive, evidence‑rich report. The recommended tools enhance accuracy, reduce labor, and provide verifiable records that satisfy adjuster requirements. Implement these practices to protect property owners, streamline claim processing, and mitigate future water damage.
Products Mentioned in This Guide
Frequently Asked Questions
What equipment is essential for forensic basement moisture monitoring?
You need a pinless moisture meter, battery‑powered water alarm sensors, a smart leak detector with data logging, a high‑resolution camera, measuring tape, notebook, waterproof marker, and protective gear.
How does a pinless moisture meter differ from traditional meters?
A pinless meter uses electromagnetic waves to assess moisture in wood or masonry without penetrating the surface, preserving the material while providing accurate readings.
What steps should be taken to document moisture findings for an insurance claim?
Record readings with timestamps, photograph affected areas, note locations with a tape measure, and store all data in a digital log or smart detector app to create a clear evidence trail.
Can consumer‑grade smart leak detectors be trusted for legal documentation?
Yes, when they offer real‑time alerts, long‑range connectivity, and exportable logs, they meet industry standards for reliable, court‑admissible evidence.
Why is early detection of hidden water intrusion important for homeowners?
Identifying hidden leaks quickly prevents mold growth, structural damage, and reduces claim disputes by providing timely, documented proof of the problem.