How to Document Basement Water Damage for Insurance Claims — A Step-by-Step Guide to Photos, Records, and Maximizing Your Payout
Introduction
When water infiltrates a basement, the financial impact can be significant. Homeowners must provide clear, organized evidence to persuade insurers to honor the full extent of the loss. This guide explains the entire documentation process, from initial assessment to final claim submission. Readers will learn how to capture high‑quality photographs, compile accurate records, and use professional tools such as the ANXTECH Handheld Thermal Camera to reveal hidden moisture. By following each step, one can increase the likelihood of receiving a maximum payout.
Background and Context
Insurance policies typically cover sudden and accidental water damage but exclude gradual seepage. Therefore, establishing the cause and timing of the incident is essential. Insurers evaluate three primary elements: the source of water, the extent of damage, and the cost of repairs. Documentation serves as the objective proof that links these elements together. In addition, many policies require that the homeowner mitigate further loss, which must also be recorded.
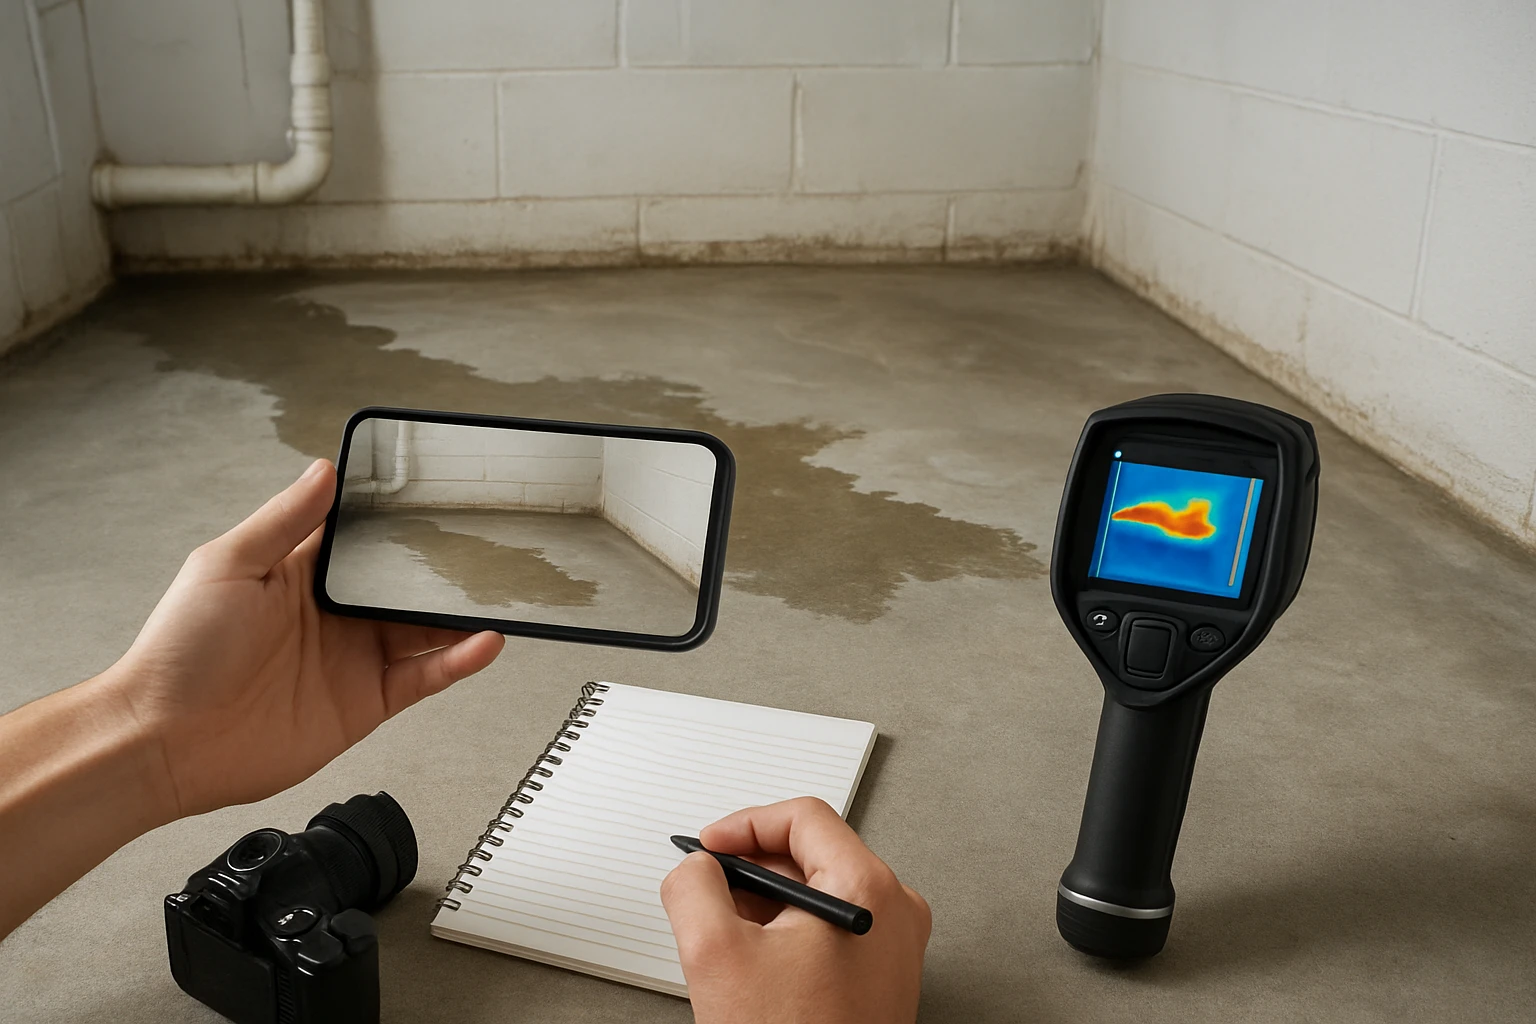
Basements present unique challenges because water can accumulate behind walls, under flooring, and within insulation. Traditional visual inspection often misses these hidden pockets. Thermal imaging technology can detect temperature differentials that indicate moisture behind surfaces, providing a scientific basis for the claim. The ANXTECH Handheld Thermal Camera offers a 240×240 resolution image and a 50° field of view, making it suitable for detailed basement surveys.
Step 1: Ensure Safety and Prevent Further Damage
Before any documentation begins, verify that the basement is safe to enter. Turn off electricity, wear waterproof boots, and use protective gloves. If standing water is present, pump it out with a submersible pump or wet‑vacuum. Document the removal process with timestamps and photos. This demonstrates to the insurer that the homeowner acted responsibly to limit additional loss.
Step 2: Capture Comprehensive Photographs
High‑resolution photographs are the cornerstone of a successful claim. Use a digital camera or a smartphone with at least 12‑megapixel capability. Follow these guidelines:
- Take wide‑angle shots of the entire basement to provide context.
- Capture close‑up images of each affected area from multiple angles.
- Include a calibrated ruler or a known‑size object in every close‑up shot for scale.
- Record the date and time stamp either on the image metadata or on a visible label within the frame.
For hidden moisture behind walls or under flooring, employ the ANXTECH Handheld Thermal Camera. Its temperature alerts highlight hot or cold spots that correspond to damp areas. Save the thermal images to the built‑in microSD card and later export them for inclusion in the claim packet.
Step 3: Record Detailed Written Notes
Accompany each photograph with a concise written description. Include the location (e.g., "north wall near the furnace"), the observed condition ("visible water pooling 2 inches deep"), and any contributing factors ("recent heavy rain, inadequate sump pump"). Use a notebook or a digital note‑taking app that timestamps entries. This narrative helps the adjuster understand the sequence of events and the severity of each issue.
Step 4: Compile Professional Assessments
When possible, obtain written evaluations from licensed contractors, plumbers, or restoration specialists. Their reports should contain:
- A description of the damage.
- Diagnostic methods used, including thermal imaging results if applicable.
- Estimated repair costs broken down by labor and materials.
- Recommendations for preventing future incidents.
These expert opinions add credibility and often carry more weight than homeowner‑generated documentation.
Step 5: Organize All Evidence for Submission
Create a master folder—either physical or cloud‑based—named after the claim number. Inside, place sub‑folders for photographs, thermal images, written notes, and professional reports. Label each file with a clear naming convention such as "2024-04-20_Basement_Wall_North_01.jpg". Include a spreadsheet that indexes every item, its description, and its location within the folder structure. When submitting electronically, compress the folder into a zip file to preserve the organization.
Comparison and Selection Guide
Choosing the right documentation tools can influence both the quality of evidence and the efficiency of the process. The table below compares three categories of devices commonly used during basement water‑damage assessments.
| Device Type | Key Features | Typical Price | Best For |
|---|---|---|---|
| Smartphone Camera | 12‑MP sensor, built‑in flash, easy sharing | $0‑$1,000 (varies) | Quick visual records, budget‑conscious users |
| Digital SLR / Mirrorless | High‑resolution (24‑MP+), interchangeable lenses, superior low‑light performance | $800‑$2,500 | Professional photographers, detailed visual documentation |
| ANXTECH Handheld Thermal Camera | 240×240 TISR resolution, 14‑hour battery, -4°F to 1022°F range, 50° lens, USB‑C charging | $129.99 | Detecting hidden moisture, verifying insulation gaps, supporting expert reports |
The ANXTECH Handheld Thermal Camera stands out for its affordability and robust feature set. Its extended battery life permits full‑day inspections without interruption, and the built‑in temperature alerts simplify the identification of problem areas. For homeowners who need more than visual evidence, this device provides the scientific data insurers often request.
Best Practices & Tips
- Perform the inspection during a stable temperature period; extreme ambient heat can mask moisture signatures.
- Calibrate the thermal camera before each use by allowing it to reach ambient temperature for at least five minutes.
- Use a tripod or stable surface to avoid motion blur in both photographic and thermal images.
- Document the condition of the sump pump, foundation walls, and drainage systems, as these are common sources of basement flooding.
- Keep a copy of the insurance policy handy; note any specific documentation clauses that may affect the claim.
Frequently Asked Questions
- 1. How many photos are enough for a claim?
- There is no strict minimum, but a thorough set typically includes 20‑30 images covering all affected areas, each with scale references.
- 2. Do I need a professional thermal imaging report?
- While not mandatory, a report from a certified thermographer can strengthen the claim, especially when hidden moisture is involved.
- 3. Can I use my phone’s infrared sensor instead of a dedicated camera?
- Most smartphones lack the sensitivity required for accurate temperature measurement; a dedicated thermal camera such as the ANXTECH model provides reliable data.
- 4. How long should I keep the documentation after the claim is settled?
- Retain all records for at least three years, as insurers may request additional information during audits.
- 5. What if my insurance adjuster disputes the damage extent?
- Submit the organized evidence package, request a re‑inspection, and consider obtaining an independent contractor’s estimate to support your position.
Conclusion
Documenting basement water damage requires meticulous preparation, accurate visual and thermal evidence, and organized record‑keeping. By following the step‑by‑step process outlined in this guide, homeowners can present a compelling case that demonstrates both the cause and the full scope of loss. Leveraging tools such as the ANXTECH Handheld Thermal Camera adds scientific credibility and often accelerates claim approval. Ultimately, thorough documentation protects the homeowner’s financial interests and facilitates a smoother recovery process.
Products Featured in This Guide
ANXTECH Handheld Thermal Camera
Price: $129.99
Rating: 4.4/5.0 (3 reviews)
Featured because it provides high‑resolution thermal imaging, a 14‑hour battery, and a wide 50° field of view, all of which are essential for uncovering hidden moisture during basement inspections.
Frequently Asked Questions
What types of water damage does homeowners insurance typically cover?
Most policies cover sudden, accidental water damage like burst pipes, but exclude gradual seepage or flood unless you have separate flood coverage.
How should I photograph basement water damage for an insurance claim?
Take clear, well‑lit photos from multiple angles, include a ruler or object for scale, and capture both the overall scene and close‑up details of affected items.
Why is a thermal camera useful when documenting basement water damage?
A handheld thermal camera reveals hidden moisture behind walls and floors, providing objective evidence of the water’s extent that photos alone may miss.
What records should I keep to support my claim?
Save receipts, repair estimates, contractor invoices, and a log of dates, water source, and mitigation steps taken after the incident.
How can I organize my documentation to maximize my insurance payout?
Create a chronological folder (digital or physical) with labeled photos, written notes, and all receipts, then submit a concise summary that ties each piece of evidence to the policy’s coverage criteria.