How to Reduce Sump Pump Noise: 12 Proven DIY Techniques to Quiet Your Basement
In many homes, a sump pump provides essential protection against flooding, yet the device often generates disruptive noise. Excessive sound can affect sleep, work‑from‑home productivity, and overall comfort. This guide explains twelve practical techniques that one can implement to minimise pump noise while preserving performance. By following these steps, one will achieve a quieter basement without extensive renovation.
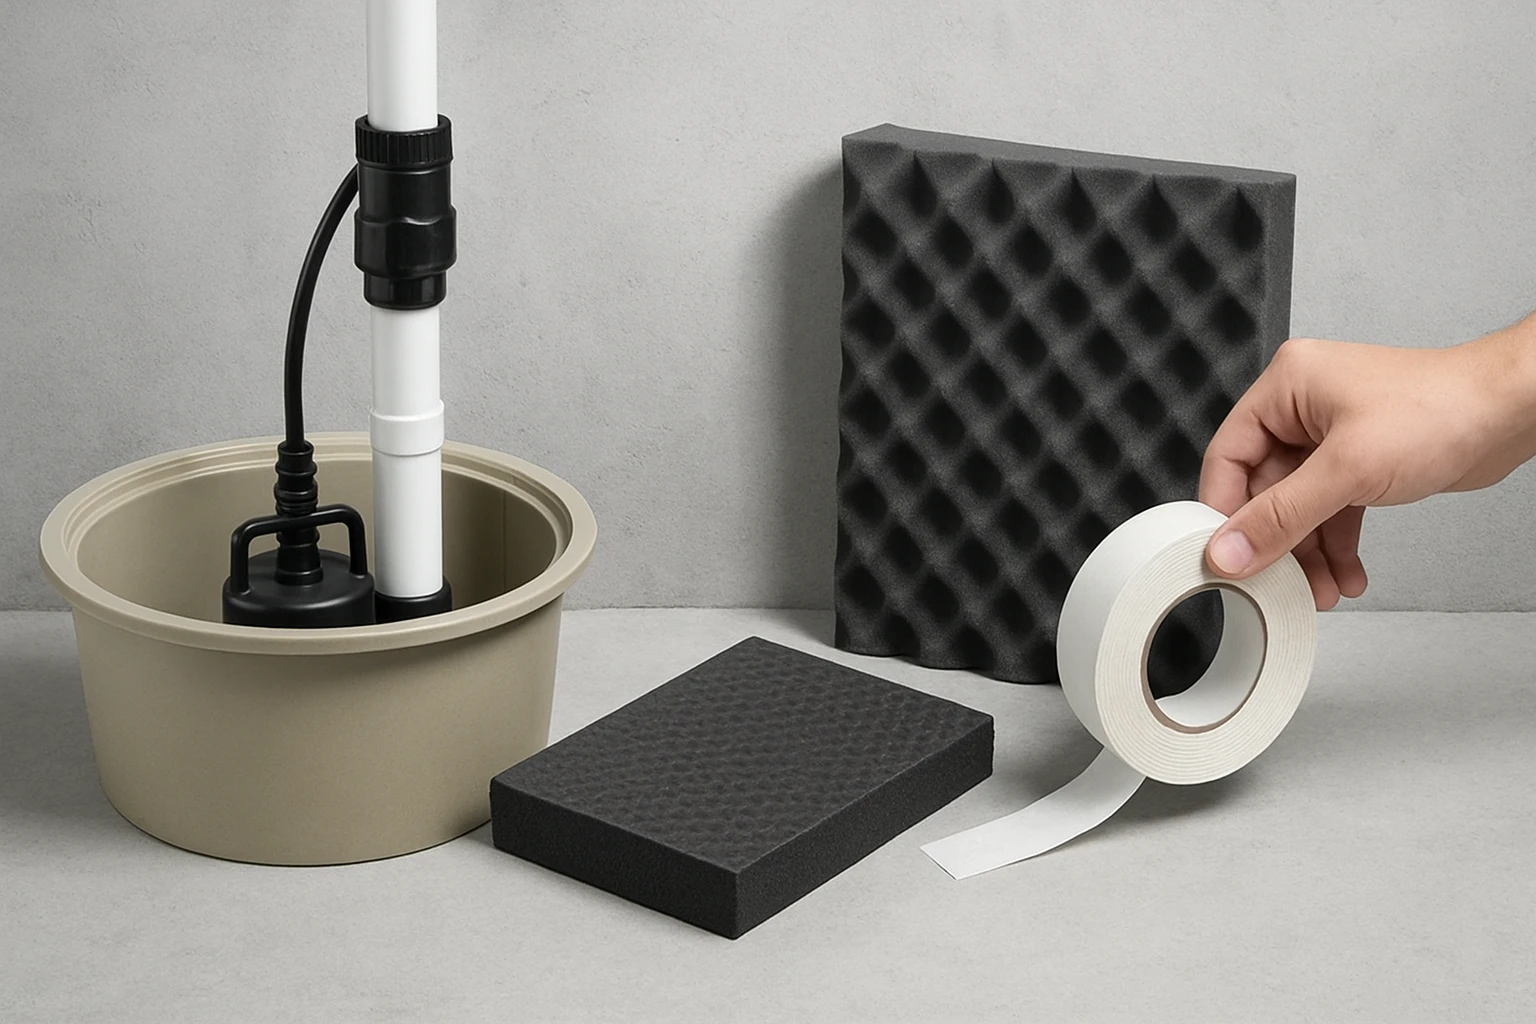
What You Will Need
- 1.5" silent check valve (e.g., Green Living Silent Sump Pump Check Valve)
- Four anti‑vibration pads (e.g., Phepetroll Anti‑Vibration Pads)
- Two self‑adhesive sound‑proof foam panels (e.g., BXI Self‑Adhesive Soundproof Foam)
- Pipe insulation, rubber grommets, silicone sealant, and basic hand tools
- Protective gloves and safety glasses
Step 1: Install a Silent Check Valve
Water hammer occurs when the pump shuts off abruptly, causing a pressure surge that produces a loud bang. Installing a silent check valve on the discharge line prevents backflow and mitigates the pressure spike. The Green Living Silent Sump Pump Check Valve features a spring‑loaded flapper that reduces water hammer noise by up to 90 percent. Its transparent body allows visual confirmation of flow, and the industrial‑grade plastic construction ensures durability. The valve fits standard 1‑1/2" pipe and can be installed by a single person in approximately ten minutes.
To install, shut off power to the pump, disconnect the discharge pipe, and slide the hubless rubber coupling onto the pipe ends. Position the valve with the flow direction arrow pointing away from the pump, then secure the clamps. Verify that the valve opens freely when the pump runs and closes when the pump stops.
Step 2: Place Anti‑Vibration Pads Under the Pump
The pump’s motor generates vibrations that travel through the concrete floor, amplifying perceived noise. Placing anti‑vibration pads beneath the pump isolates these vibrations. The Phepetroll Anti‑Vibration Pads consist of a high‑strength rubber layer combined with a blue EVA core, offering superior damping properties. Each pad supports up to 960 lb and measures 4" × 4" × 7/8", making it suitable for most residential sump pumps.
Remove the pump from its pit, clean the base, and position one pad at each corner of the pump housing. Ensure the ribbed surfaces face downward to maximise friction and prevent slipping. Reinstall the pump, reconnect the power, and observe a noticeable reduction in vibration‑induced noise.
Step 3: Apply Self‑Adhesive Soundproof Foam Around the Pump Enclosure
Even with a silent valve and vibration pads, airborne sound can escape through gaps in the pump enclosure. Applying acoustic foam to the interior walls of the pit absorbs residual noise. The BXI Self‑Adhesive Soundproof Foam panels are 1.8" thick, closed‑cell egg‑crate foam with a strong adhesive backing. They provide both sound absorption and thermal insulation, protecting the pump from temperature extremes.
Measure the interior surfaces of the pit, cut the foam to size, and press the panels firmly onto the walls. Overlap seams slightly to avoid gaps. The foam’s waterproof nature ensures long‑term performance in damp environments.
Step 4: Insulate the Discharge Pipe
Cold water flowing through an uninsulated pipe can create a rattling sound as it expands and contracts. Wrap the discharge pipe with foam pipe insulation to dampen these vibrations. Use a pipe wrap that fits 1‑1/2" pipe, secure it with tape, and ensure the insulation extends from the pump outlet to the exterior termination.
Proper insulation also improves energy efficiency by reducing heat loss, which can be beneficial in colder climates.
Step 5: Replace Rigid Pipe Segments with Flexible Hose
Rigid PVC pipe transmits vibration more efficiently than flexible hose. Substituting a short section of flexible hose near the pump allows the system to absorb shock. Choose a hose rated for the pump’s flow rate and pressure, and secure it with hose clamps.
Flexibility reduces the transmission of vibration to the surrounding structure, thereby lowering audible noise.
Step 6: Add a Rubber Gasket Between Pump and Base
Direct contact between the pump housing and the concrete base can amplify vibrations. Placing a thin rubber gasket between these surfaces creates a cushioning layer. Use a gasket material that resists water and chemicals, such as EPDM rubber.
Cut the gasket to match the pump’s footprint, position it, and reinstall the pump. The gasket acts as a decoupling element, further reducing transmitted sound.
Step 7: Seal Vent Openings
Improperly sealed vent openings in the pump’s housing can allow high‑pressure air to escape with a hissing sound. Inspect the vent for cracks or gaps, and seal any openings with silicone sealant. Choose a marine‑grade silicone that remains flexible when exposed to moisture.
Apply the sealant in a continuous bead, smooth it with a finger or tool, and allow it to cure according to the manufacturer’s instructions.
Step 8: Construct a Simple Pump Enclosure Box
Building a lightweight enclosure around the pump can contain noise while preserving airflow. Use 2" plywood or MDF, cut panels to fit around the pump, and leave a small vent for air intake. Line the interior of the box with the BXI soundproof foam for added absorption.
Secure the box with screws, and ensure the pump’s discharge pipe exits through a sealed opening to maintain the acoustic barrier.
Step 9: Adjust Pump Speed (If Variable)
Some modern sump pumps feature variable‑speed controllers that allow the user to set a lower speed for reduced noise. Consult the pump’s manual to determine the optimal speed setting that balances flow rate with acoustic comfort. Lower speeds reduce motor vibration and water turbulence, both of which contribute to noise.
Test the pump at the new speed for a full cycle to confirm that it still removes water efficiently.
Step 10: Install a Water Hammer Arrestor
A water hammer arrestor is a small chamber filled with air or gas that absorbs pressure spikes. Installing an arrestor on the discharge line downstream of the check valve provides an additional layer of protection against sudden shut‑off noise. Choose an arrestor rated for the pump’s flow and pressure, and install it using the same pipe size.
Secure the arrestor with pipe clamps, and verify that the system remains leak‑free after installation.
Step 11: Apply Acoustic Sealant to Gaps
Small gaps around pipe penetrations and the pump housing can act as sound leaks. Apply an acoustic sealant, such as a non‑shrinking polyurethane caulk, to fill these voids. The sealant remains flexible, preventing cracks that could re‑introduce noise.
Run a bead of sealant around each gap, smooth it, and allow it to cure. This step complements the other techniques by eliminating airborne sound pathways.
Step 12: Perform Regular Maintenance
Accumulated debris, worn bearings, and loose fittings can increase pump noise over time. Schedule quarterly inspections to clean the pump inlet, lubricate bearings if applicable, and tighten all connections. Replace any worn components promptly to maintain quiet operation.
Regular maintenance not only preserves a low‑noise environment but also extends the life of the pump system.
Tips & Pro Tips
- Before beginning any work, disconnect power to the pump to avoid electrical hazards.
- When cutting foam or insulation, wear a dust mask to prevent inhalation of particles.
- Test the system after each modification to ensure that water flow remains adequate.
- Combine multiple techniques—such as a silent check valve, vibration pads, and acoustic foam—for maximal noise reduction.
Troubleshooting
| Problem | Possible Cause | Solution |
|---|---|---|
| Persistent banging sound | Water hammer not fully mitigated | Install a water hammer arrestor and verify check valve orientation. |
| Vibration felt on floor | Insufficient isolation | Replace anti‑vibration pads with higher‑load capacity or add additional pads. |
| Heat buildup in pump | Inadequate ventilation | Ensure enclosure has proper vent holes and do not block airflow. |
Conclusion
Reducing sump pump noise requires a systematic approach that addresses vibration, water hammer, and airborne sound. By implementing the twelve techniques outlined above, one can achieve a quiet basement while maintaining reliable flood protection. The recommended tools—such as the Green Living Silent Sump Pump Check Valve, Phepetroll Anti‑Vibration Pads, and BXI Self‑Adhesive Soundproof Foam—provide effective, affordable solutions that complement traditional maintenance practices.
One should evaluate each step, apply the appropriate product, and monitor results. Over time, the combined effect will create a peaceful environment without compromising the pump’s performance.
Products Mentioned in This Guide
Frequently Asked Questions
What causes a sump pump to be noisy?
The noise typically comes from vibration, cavitation, and the pump’s motor and check valve.
How can anti‑vibration pads help reduce sump pump noise?
Placing pads under the pump isolates vibrations from the concrete floor, cutting transmitted sound.
Why should I install a silent check valve?
A silent check valve prevents water hammer and eliminates the loud clicking sound when the pump shuts off.
What role does sound‑proof foam play in quieting a sump pump?
Foam panels absorb airborne noise and can be applied to the pump enclosure or surrounding walls.
Are there any simple insulation steps for the discharge pipe?
Wrapping the pipe with insulation and using rubber grommets at fittings reduces vibration‑borne noise.