How to Use Thermal Imaging and Humidity Sensors to Find Hidden Water Entry — Step‑by‑Step Guide
Introduction
One will learn how to locate concealed water intrusion by combining infrared thermography with precise humidity monitoring. The guide explains why temperature differentials often reveal moisture behind walls, ceilings, and floors. It also demonstrates how to interpret sensor data to confirm the presence of water before costly demolition begins. By following each step, one can protect property value and reduce repair expenses.
What You'll Need
- A handheld thermal imaging camera such as the HSFTOOLS HF96 Thermal Camera
- An advanced thermal imager like the Thermal Master Handheld Thermal Camera (price $359.10, rating 4.5/5)
- A budget‑friendly alternative such as the Flagfront Handheld Thermal Camera (rating 4.4/5)
- A temperature and humidity controller like the DIGITEN Temp & Humidity Controller
- Protective gloves, a ladder, a notebook, and a camera for documentation
Step 1: Prepare the Inspection Area
One should begin by clearing the area of debris and ensuring adequate lighting for safe movement. All electrical outlets and appliances must be turned off to avoid false temperature spikes caused by active devices. It is advisable to record ambient conditions, such as outdoor temperature and relative humidity, because they influence thermal contrast. A clean workspace also reduces the risk of contaminating sensor surfaces.
Step 2: Calibrate and Configure Your Thermal Camera
The first thermal tool to employ is the HSFTOOLS HF96 Thermal Camera. This device integrates a thermometer, laser pointer, and AI‑driven scene detection, which simplifies initial setup. One should download the latest firmware from the manufacturer’s website, then select the “Scene” mode to enable IntellFault detection of water leaks and insulation gaps. Adjust emissivity settings according to the material being examined; the HF96 allows fine‑tuning to improve temperature accuracy across surfaces such as brick, wood, or drywall.
Step 3: Perform a Broad Thermal Scan
Using a high‑resolution imager like the Thermal Master Handheld Thermal Camera, one should sweep each wall, floor, and ceiling at a distance of 1–2 feet. The 512×384 X³IR sensor delivers a 25 Hz refresh rate and 40 mK sensitivity, allowing detection of temperature differences as small as 0.04 °F. Focus on areas where temperature deviates by more than 2 °F from the surrounding baseline, as these hotspots often indicate moisture accumulation. If budget constraints exist, the Flagfront Handheld Thermal Camera provides comparable 240×240 super‑resolution imaging and a 25 Hz frame rate, which is sufficient for residential inspections.
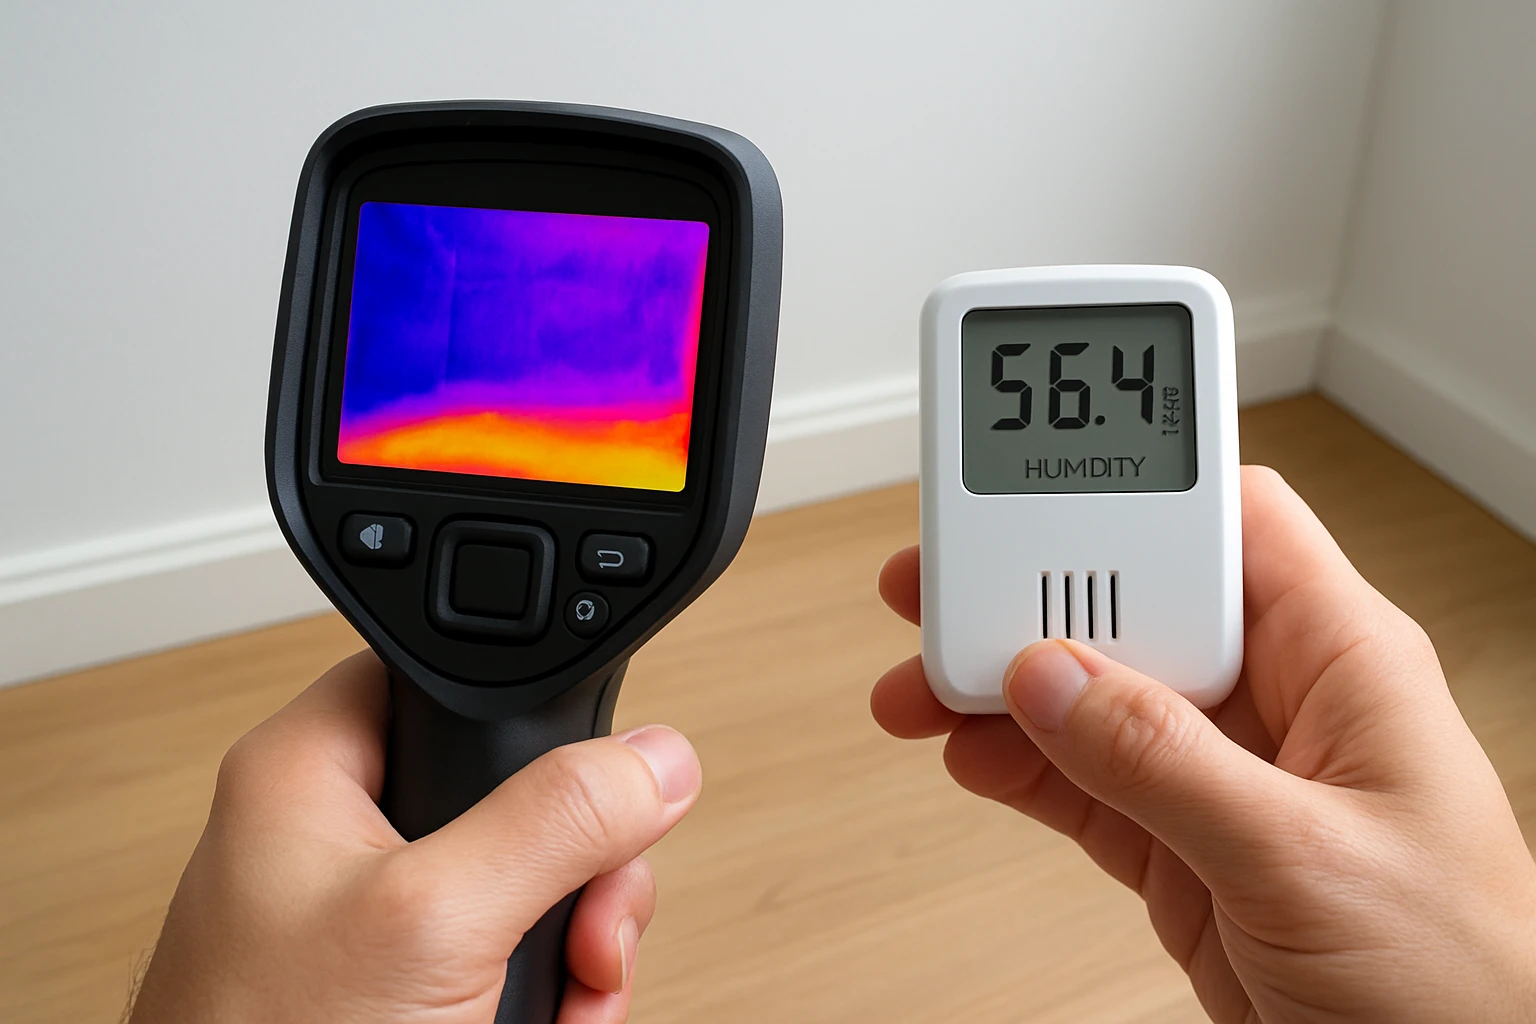
Step 4: Verify with a Humidity Sensor
After identifying a thermal anomaly, one should confirm the presence of moisture using the DIGITEN Temp & Humidity Controller. This dual‑sensor unit measures relative humidity from 1 %RH to 100 %RH and temperature from –40 °F to 248 °F, providing real‑time alerts when humidity exceeds preset thresholds. Place the sensor near the suspect area and observe the reading for at least five minutes; a sustained humidity level above 60 %RH typically signifies active water ingress. The device’s LCD display and audible alarms make it easy to track changes without constant visual monitoring.
Step 5: Document Findings and Create a Heat Map
One should capture thermal images using the camera’s built‑in photo function and label each with location, time, and observed temperature range. Export the images to a laptop via USB or Wi‑Fi, depending on the camera model, and compile them into a single report. Annotate the heat map with arrows pointing to hotspots and include humidity readings from the DIGITEN controller to correlate temperature and moisture data. This documentation serves as evidence for contractors and insurance adjusters, and it guides targeted remediation.
Step 6: Implement Mitigation Measures
Based on the documented evidence, one can prioritize repair actions such as resealing windows, repairing roof flashing, or installing a vapor barrier. In cases where moisture has saturated building materials, it is advisable to use dehumidifiers and increase ventilation to accelerate drying. Re‑inspect the repaired zones after 48 hours using the same thermal and humidity tools to verify that temperature differentials have normalized. Continuous monitoring with the DIGITEN controller can prevent future water entry by alerting occupants before damage occurs.
Tips & Pro Tips
- Conduct inspections during early morning or late evening when outdoor temperatures are stable; this maximizes thermal contrast.
- Use the laser pointer on the HF96 to mark exact locations of anomalies, which simplifies later physical inspection.
- Set the high‑temperature alarm on the Thermal Master to 120 °F and the low‑temperature alarm to 60 °F; these thresholds quickly isolate outliers.
- When using the DIGITEN controller, enable both temperature and humidity logging to create a time‑series dataset for trend analysis.
- Wear insulated gloves to avoid transferring body heat to surfaces, which could distort thermal readings.
Troubleshooting
Problem: Thermal images appear uniformly gray with no hotspots.
Solution: Verify emissivity is set to 0.95 for most building materials, ensure the camera is not in “Palette” mode that reduces contrast, and increase the distance to the target to capture a broader field of view.
Problem: Humidity sensor shows erratic spikes.
Solution: Allow the DIGITEN controller to acclimate for at least ten minutes before measurement, and avoid placing it directly in sunlight or near drafts.
Conclusion
One has now learned a systematic approach to locate hidden water entry by integrating thermal imaging and precise humidity sensing. The combination of AI‑enhanced cameras, high‑resolution infrared sensors, and a dual‑function controller provides reliable data that reduces guesswork. By documenting findings and applying targeted repairs, one can protect structures from long‑term water damage. Continued use of these tools will maintain a dry, energy‑efficient environment for years to come.
Products Mentioned in This Guide
Frequently Asked Questions
Why combine thermal imaging with humidity sensors when searching for hidden water leaks?
Thermal imaging reveals temperature differences caused by moisture, while humidity sensors confirm moisture levels, reducing false positives before demolition.
What temperature differential indicates possible water intrusion?
A drop of 2‑5 °F (1‑3 °C) compared to surrounding areas often signals hidden moisture behind surfaces.
Which type of thermal camera is best for beginners?
A budget‑friendly handheld like the Flagfront Handheld Thermal Camera offers sufficient resolution and ease of use for basic leak detection.
How do I interpret humidity sensor readings on walls?
Readings above 60% relative humidity on interior walls typically suggest moisture accumulation, especially when paired with a thermal anomaly.
Can I rely solely on a thermal camera to locate water entry points?
No; thermal images show temperature patterns but must be verified with humidity data to confirm actual water presence.