How to Waterproof Your Basement This Spring: Essential Step‑by‑Step Checklist to Prevent Leaks
Introduction
Spring brings higher groundwater levels and increased precipitation, which can expose weaknesses in a basement envelope. This guide will teach the reader how to evaluate, repair, and protect a basement using proven techniques and reliable tools. By following each step, one can reduce the risk of water intrusion, protect personal property, and preserve the structural integrity of the home. The information presented is practical for an intermediate DIY audience and does not require professional contractors, although professional assistance remains an option for complex situations.
What You’ll Need
- Protective gear: gloves, goggles, and a dust mask.
- Cleaning supplies: a stiff‑bristle brush, shop‑vac, and mild detergent.
- Concrete crack repair kit – Hydra Stop Concrete Crack Repair Kit.
- Elastomeric waterproof coating – AMES Blue MAX Waterproof Sealer.
- Rollers, brushes, or spray equipment suitable for liquid rubber.
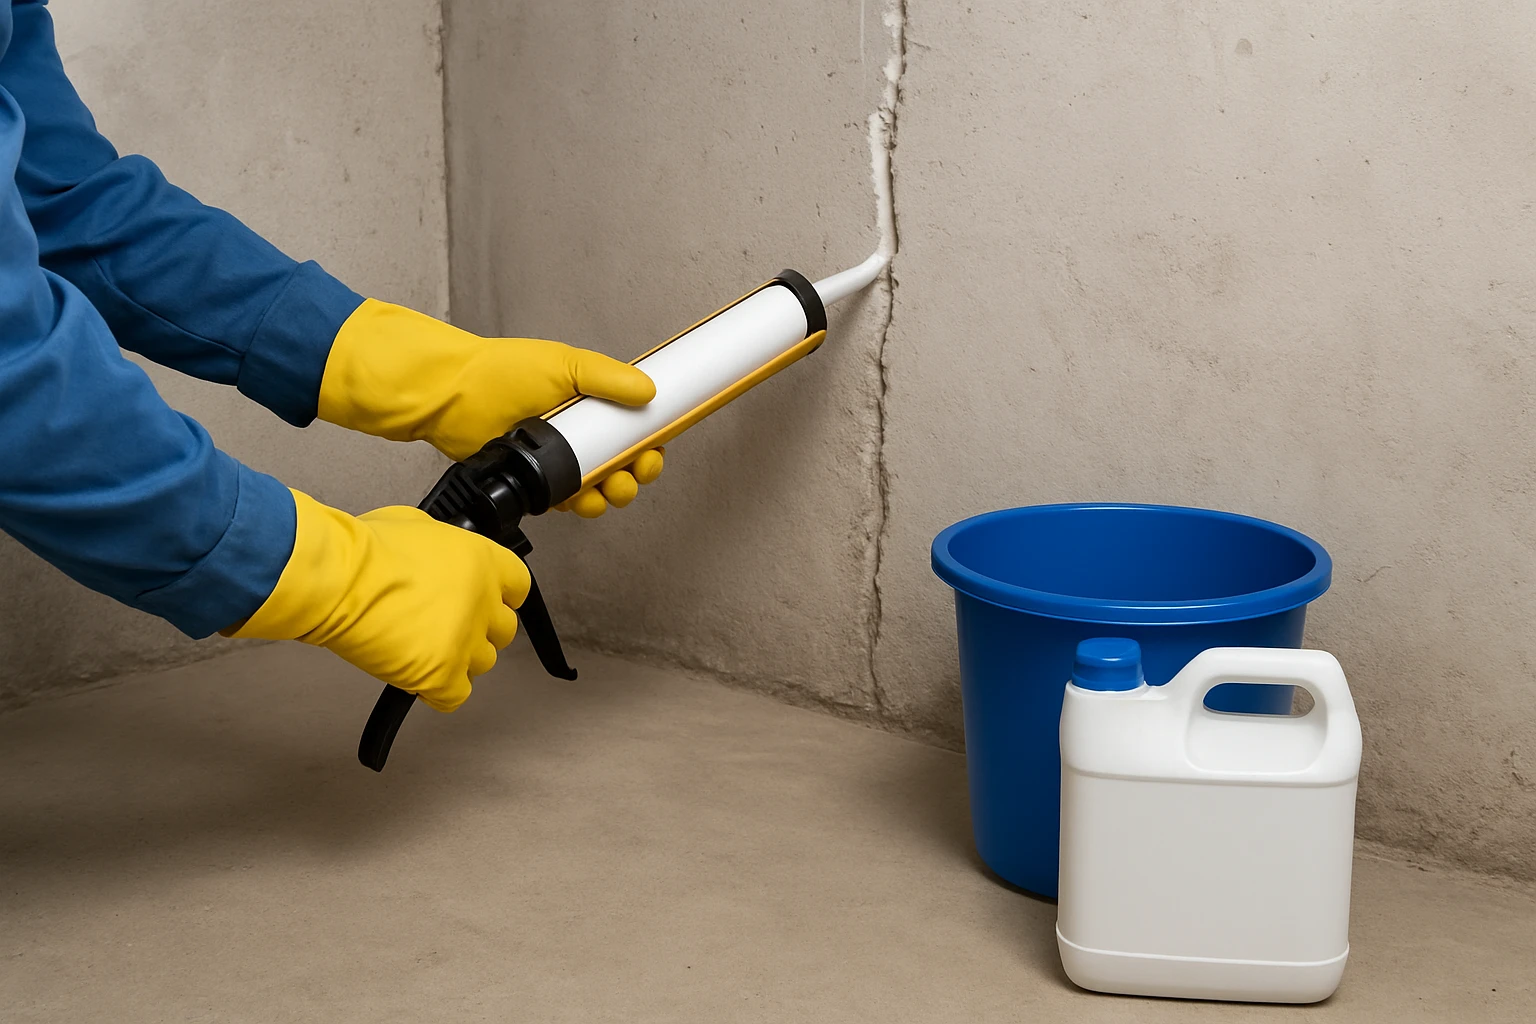
- Sealant tape, backer rod, and a caulk gun for minor gaps.
Step 1 – Inspect and Clean the Basement
The first major step is a thorough visual inspection of walls, floors, and any existing drainage systems. Look for damp spots, efflorescence, mold growth, and cracks wider than 1/8 inch, as these are common pathways for water ingress. Once problem areas are identified, remove all debris, dust, and loose paint using a shop‑vac and a stiff brush, then wash the surfaces with a mild detergent solution. Allow the walls and floor to dry completely; a dehumidifier can accelerate this process, ensuring that subsequent sealants adhere properly.
Step 2 – Repair Cracks and Structural Gaps
Cracks in concrete walls or floors act as direct channels for water, especially during heavy rains. For cracks up to 1/4 inch, the Hydra Stop Concrete Crack Repair Kit provides a fast‑setting polyurethane foam that expands to fill voids and creates a waterproof barrier. The kit includes two 10‑foot tubes of Hydra Stop 300 foam, epoxy paste for port adhesion, and all necessary accessories.
Begin by cleaning the crack with a wire brush, then apply the epoxy paste to embed the injection ports. Insert a port every 6‑8 inches along the crack, ensuring a tight seal. Attach the foam injection hose, and slowly dispense the polyurethane; the foam will expand two to three times its liquid volume, filling the crack from bottom to top. Allow the foam to cure according to the manufacturer’s instructions, typically 30‑45 minutes, before removing excess material and smoothing the surface with a putty knife.
For gaps around pipe penetrations or window frames, use a high‑quality backer rod followed by a silicone or polyurethane sealant. This step prevents water from bypassing the main waterproofing membrane.
Step 3 – Apply a Primer (If Required)
Some concrete surfaces benefit from a primer to improve adhesion of the elastomeric coating. If the substrate is highly porous or previously painted, a thin coat of the same AMES Blue MAX Waterproof Sealer can serve as a primer. Apply the primer with a roller, ensuring an even film that fully wets the surface. Allow the primer to dry for at least one hour before proceeding to the main coating.
Step 4 – Apply the Elastomeric Waterproof Coating
The core of the waterproofing system is the elastomeric liquid rubber coating, which provides a flexible, crack‑bridging membrane. The AMES Blue MAX Waterproof Sealer is a water‑based, high‑adhesion product with 1200 % elongation, allowing it to move with the concrete and resist future cracking.
Mix the sealer gently to avoid introducing air bubbles, then apply the first coat using a ¾‑inch nap roller or a brush for hard‑to‑reach corners. Aim for a film thickness of approximately 30 mil; the product’s label recommends two coats for optimal performance. After the first coat dries (typically 4‑6 hours), inspect for missed spots, then apply the second coat in the same manner. The finished membrane will appear as a uniform blue film that remains breathable while blocking water.
For large basements, a low‑volume air‑less sprayer can speed up application, but the roller method ensures better control for DIY users. Ensure adequate ventilation during application, and wear protective gloves and goggles.
Step 5 – Install or Verify Drainage Systems
Even a perfectly sealed basement can suffer if interior or exterior drainage is insufficient. Verify that floor drains, sump pumps, and interior French drains are operational and free of debris. If a sump pump is absent, consider installing one before the waterproofing coat dries, as water that accumulates behind the membrane can cause delamination.
Exterior grading should slope away from the foundation at a minimum of 6 inches per 10 feet. If grading is inadequate, add soil and a drainage mat to redirect surface water. While this guide focuses on interior sealing, a holistic approach that includes proper drainage maximizes long‑term protection.
Tips & Pro Tips
- Test the moisture level of the concrete with a moisture meter; values below 5 % are ideal before coating.
- Work in sections no larger than 10 sq ft to maintain a wet edge and avoid lap lines.
- When using the Hydra Stop kit, press the injection ports firmly into the epoxy paste to prevent premature foam leakage.
- Maintain a temperature between 55 °F and 85 °F during application; extreme cold can slow curing.
- Apply a third thin coat of the Blue MAX sealer in high‑traffic areas to increase abrasion resistance.
Troubleshooting
Problem: Foam from the Hydra Stop kit leaks out of the injection port instead of filling the crack.
Solution: Ensure the epoxy paste fully covers the port base and that the port is seated flush with the crack surface. Apply a thin layer of epoxy around the port before injection.
Problem: The Blue MAX coating peels after curing.
Solution: Verify that the substrate was clean, dry, and free of loose particles. A primer coat may be required on highly porous surfaces.
Problem: Persistent damp spots after sealing.
Solution: Check for hidden cracks or inadequate drainage. Re‑inspect the perimeter for water pooling and consider adding a secondary interior drainage channel.
Conclusion
By following this systematic checklist, the reader can confidently waterproof a basement, reduce the likelihood of water damage, and protect the home’s value. The combination of proper inspection, targeted crack repair with the Hydra Stop Concrete Crack Repair Kit, and the application of the flexible AMES Blue MAX Waterproof Sealer creates a durable barrier against spring rains. Even homeowners who choose not to purchase these products can apply the same principles using alternative, compatible materials. Regular maintenance and periodic re‑inspection will ensure the basement remains dry for years to come.
Products Mentioned in This Guide
AMES Blue MAX Waterproof Sealer
Price: $174.83
Rating: 4.6/5.0 (563 reviews)
Key features: 1200 % elongation elastomeric liquid rubber, suitable for interior and below‑grade exterior concrete, non‑toxic, VOC‑compliant, made in the USA.
Hydra Stop Concrete Crack Repair Kit
Price: $158.90
Rating: 4.3/5.0 (686 reviews)
Key features: 10 ft of Hydra Stop 300 polyurethane foam, epoxy paste, ports, caulk gun, gloves, safety glasses, and detailed instructions for DIY foundation crack repair.
Frequently Asked Questions
What are the first steps to assess basement waterproofing needs in spring?
Inspect walls and floors for cracks, damp spots, and water stains, then test for moisture with a moisture meter or plastic sheet test.
Which tools and protective gear are essential for DIY basement waterproofing?
Wear gloves, goggles, and a dust mask, and use a stiff‑bristle brush, shop‑vac, mild detergent, a concrete crack repair kit, and elastomeric coating.
How do I repair small cracks in a concrete basement wall?
Clean the crack, apply a hydraulic cement or epoxy from a concrete crack repair kit, and let it cure according to the manufacturer’s instructions.
What is the best way to apply an elastomeric waterproof coating?
After the surface is clean and dry, roll or brush the coating in thin, even layers, allowing each coat to dry before applying the next, typically two coats total.
When should I consider hiring a professional instead of DIY?
If you encounter large structural cracks, persistent flooding, or need extensive exterior drainage systems, a licensed contractor is recommended.