How to Winterproof Your Dehumidifier's Outdoor Condensate Drain: Stop Freezing, Backups & Damage
Introduction
When winter temperatures drop below freezing, the condensate produced by a dehumidifier can solidify inside the outdoor drainage line. Frozen water creates blockages, forces the unit to shut down, and may cause costly water damage to the surrounding structure. This guide explains how to winterproof the condensate drain, maintain reliable operation throughout the cold season, and avoid expensive repairs. By following the steps below, one will protect the equipment, preserve indoor air quality, and extend the lifespan of the dehumidifier.
The instructions are written for homeowners who have a standard portable or whole‑house dehumidifier with an external drain hose. The guide is practical, actionable, and includes product recommendations that act as tools rather than sales pitches. Even without purchasing any items, one can still implement the core techniques.
What You’ll Need
- Insulation material (foam pipe sleeves or self‑adhesive wrap)
- Heat tape or thermostatically controlled heating cable
- Condensate pump (optional but highly recommended for low‑lying installations)
- Drain grate cover to keep debris out of the pipe
- Silicone sealant and hose clamps
- Basic tools: screwdriver, utility knife, tape measure
All of the recommended products are available on Amazon and meet the performance criteria for winter operation.
Step 1: Assess the Existing Drainage Layout
The first task is to locate the condensate drain hose, verify its length, and identify any low points where water may pool. One should measure the vertical distance from the dehumidifier to the termination point, typically a floor drain, utility sink, or outdoor pipe. If the hose runs along an exterior wall, it is exposed to sub‑zero temperatures and must be protected.
During the assessment, inspect the hose for cracks, kinks, or loose connections. A damaged hose can leak when water expands during freezing, creating ice plugs that exacerbate the problem. Replace any compromised sections before proceeding.
Document the layout with a simple sketch, noting the direction of flow, bends, and the location of any existing pump or check valve. This sketch will serve as a reference when installing insulation and heating elements.
At this stage, one may consider adding a condensate pump if the drain line is low or if the unit is installed on a basement slab. A pump eliminates reliance on gravity and provides a controlled discharge point.
Step 2: Install a Condensate Pump (Optional but Recommended)
If the existing drain relies solely on gravity, installing a pump ensures that water is moved quickly away from the unit, reducing the time it spends in cold ambient air. The Aquastrong Auto Condensate Pump is a robust choice for this application.
Key features of the Aquastrong pump include a 70 GPH flow rate, vertical lift capability of up to 16 feet, and a built‑in safety switch that shuts off the dehumidifier when the reservoir reaches a high level. The pump is rated at $699.00 and holds a 4.5‑star rating from 317 reviews, indicating strong customer satisfaction.
Installation steps:
- Place the pump on a flat, vertical surface near the dehumidifier. The unit includes a 1/2‑gallon removable reservoir for easy cleaning.
- Connect the dehumidifier’s drain hose to one of the five 1‑inch inlet ports. Use hose clamps to secure the connection.
- Attach the 2/5‑inch barbed outlet to a short length of 1/4‑to‑3/8‑inch tubing that leads to the outdoor pipe. The built‑in check valve prevents backflow.
- Plug the UL‑certified 3.3‑foot power cord into a nearby GFCI outlet. The float switch will automatically start the pump when water reaches 1.63 inches and stop at 0.9 inches.
The pump’s automatic operation eliminates the need for manual monitoring, and its safety switch protects the dehumidifier from overflow damage. For lower‑budget projects, the MSKOTOAS Condensate Pump provides 132 GPH flow, 20‑foot lift, and an integrated alarm for overflow situations. Priced at $59.99 with a 4.5‑star rating from 72 reviews, it offers excellent value for residential installations.
Both pumps include multiple inlet ports, allowing connection of additional appliances such as an ice maker or secondary dehumidifier without additional plumbing work.
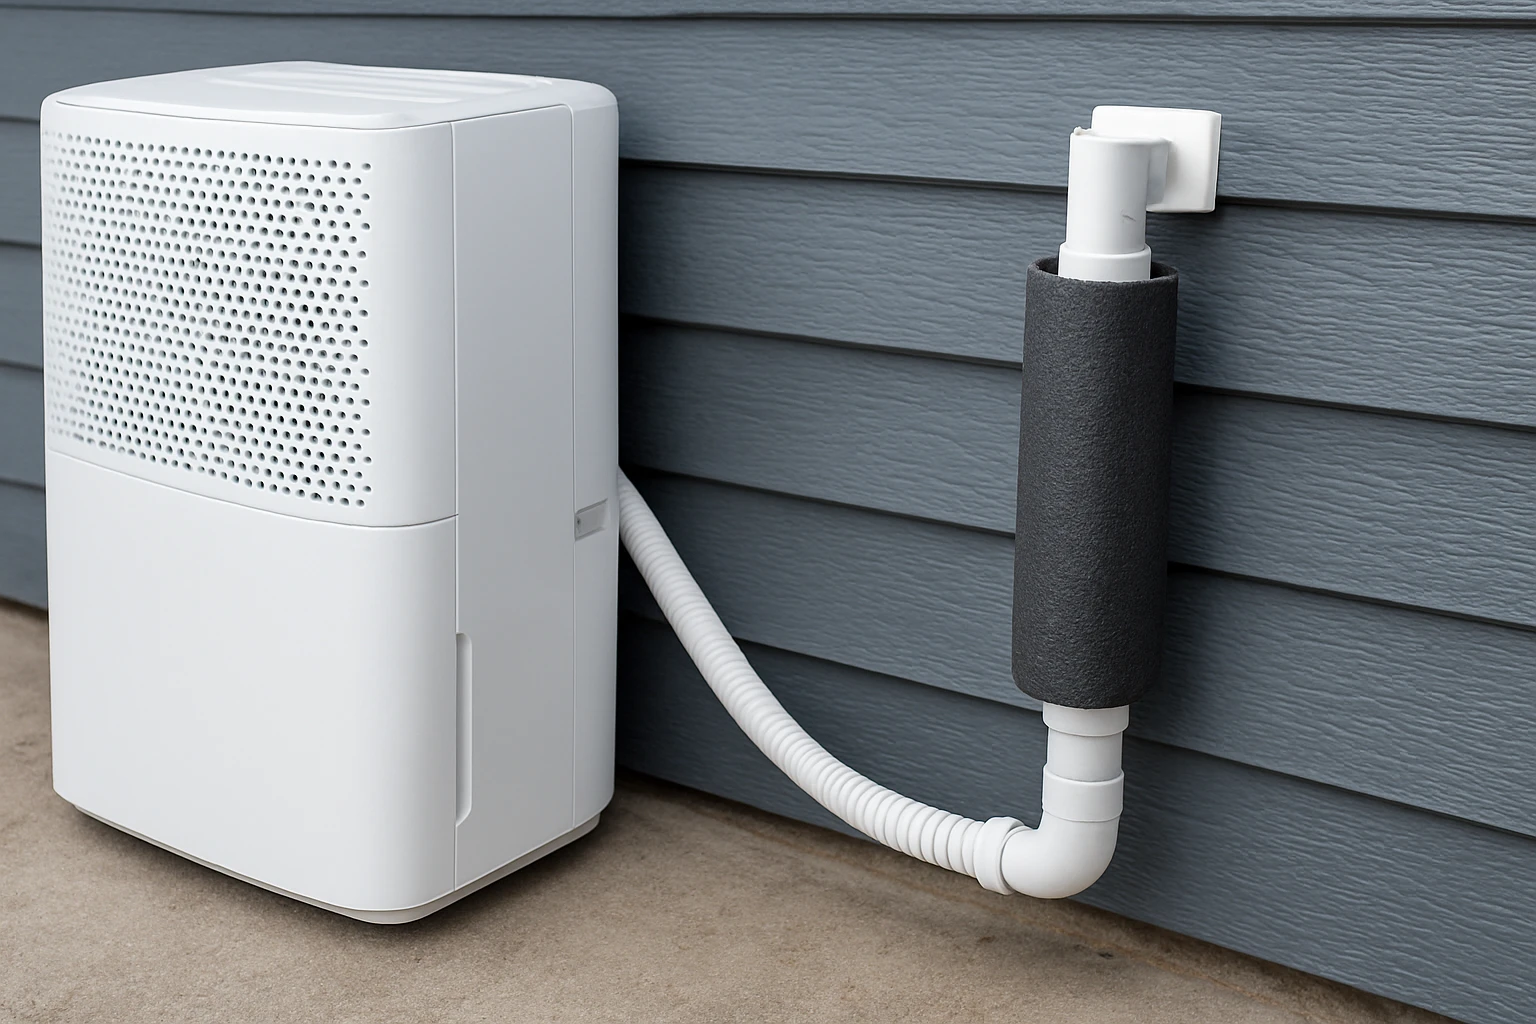
Step 3: Insulate the Drain Pipe
Insulation is the most effective barrier against freezing. Foam pipe sleeves with an inner diameter that matches the drain hose are inexpensive and easy to install. Cut the sleeve to length, slip it over the hose, and secure the ends with zip ties.
For sections that are exposed to wind or direct sunlight, consider using self‑adhesive insulation tape. This tape provides an extra layer of protection and prevents moisture from condensing on the outer surface of the sleeve.
If the pipe runs through an unheated crawl space, add a layer of rigid foam board around the insulated hose and seal any gaps with expanding foam. This creates a micro‑environment that retains heat generated by the pump or heat tape.
When insulating, ensure that the material does not obstruct the pump’s check valve or the drain grate cover. Proper clearance maintains reliable flow and prevents accidental blockage.
Step 4: Apply Heat Tape or Heating Cable
Insulation alone may not be sufficient for prolonged sub‑zero conditions, especially when the pipe is long or has multiple bends. Heat tape provides active warming and is designed to shut off automatically when the pipe reaches a safe temperature, preventing overheating.
Choose a heat tape rated for the pipe’s material (PVC or metal) and length. Wrap the tape in a spiral pattern, overlapping each turn by approximately one inch. Secure the ends with the supplied zip ties and connect the tape to a dedicated outlet protected by a GFCI circuit.Set the thermostat on the heat tape to a temperature slightly above freezing, typically 38‑40 °F (3‑4 °C). The tape will maintain the pipe temperature just enough to keep water flowing without melting snow on the exterior surface.
When using heat tape in conjunction with a condensate pump, position the tape on the section of pipe downstream of the pump. The pump will move water through the warmed segment, further reducing the risk of ice formation.
Step 5: Install a Drain Grate Cover
Debris such as leaves, twigs, and dirt can accumulate at the pipe’s termination point, creating a partial blockage that encourages freezing. A grate cover prevents foreign material from entering while allowing water to pass freely.
The JSP 4" Flat Drain Grate Cover is a heavy‑duty, injection‑molded plastic grate designed for outdoor use. It costs $14.98, carries a 4.7‑star rating from 123 reviews, and is available in green to blend with landscaping.
Installation steps:
- Place the grate over the pipe opening, ensuring the large slots align with the flow direction.
- Secure the grate with the supplied mounting bolts or adhesive silicone if drilling is not possible.
- Verify that water drains freely by pouring a small amount of water into the pipe and observing the flow.
The grate’s design accommodates pedestrian, bicycle, and wheelchair traffic, making it suitable for walkways and patios where foot traffic is common. Its transparent construction allows visual inspection of water flow without removal.
Step 6: Seal All Connections and Test the System
After installing the pump, insulation, heat tape, and grate, it is essential to seal every joint to prevent air leaks that can accelerate heat loss. Apply a bead of silicone sealant around each hose clamp and pipe joint, then smooth the seal with a gloved fingertip.
Run the dehumidifier in a controlled environment and observe the pump’s operation. Verify that the float switch activates the pump at the correct water level and that the safety switch cuts power when the reservoir reaches the high‑level threshold.
Check the entire drainage path for leaks, drips, or condensation on the insulation. If any issues are detected, tighten the clamps, re‑apply sealant, or adjust the heat tape’s thermostat.
Finally, simulate winter conditions by spraying cold water onto the insulated pipe and observing whether ice forms. The system should remain clear, indicating successful winterproofing.
Tips & Pro Tips
- Schedule a semi‑annual cleaning of the pump’s reservoir, float, and filter. Accumulated debris reduces flow efficiency and can cause the pump to overheat.
- Use a water‑proof timer to run the dehumidifier during the warmest part of the day in winter, reducing the amount of condensate produced at night when temperatures are lowest.
- Consider installing a secondary overflow alarm near the pump’s reservoir. A simple low‑cost water sensor can alert you via smartphone if the pump fails.
- If the outdoor pipe passes through a vented attic, add additional insulation to the attic space to maintain a consistent temperature around the pipe.
- When selecting heat tape, verify that it is UL‑listed for outdoor use and that the circuit it is connected to is protected by a ground‑fault circuit interrupter (GFCI).
Troubleshooting
| Problem | Possible Cause | Solution |
|---|---|---|
| Pump does not start | Float switch stuck or power not supplied | Inspect float for debris, ensure the outlet is dry, and verify GFCI outlet is on. |
| Water freezes in pipe | Insulation insufficient or heat tape malfunctioning | Replace damaged insulation, test heat tape continuity, and increase thermostat setting by 2 °F. |
| Backflow into dehumidifier | Check valve blocked | Remove the outlet tubing, clean the check valve, and reinstall ensuring proper orientation. |
| Excessive noise | Pump mounted on resonant surface | Place a rubber mat or vibration isolator under the pump to dampen sound. |
Conclusion
Winterproofing a dehumidifier’s outdoor condensate drain requires a systematic approach: assess the layout, install a reliable condensate pump, insulate the pipe, apply heat tape, protect the outlet with a grate, and seal every connection. By following the steps outlined in this guide, one can prevent freezing, avoid costly backups, and ensure continuous operation throughout the cold months. Regular maintenance and periodic inspection will keep the system performing at peak efficiency year after year.
Implementing these measures not only safeguards the dehumidifier but also protects the surrounding structure from water damage, ultimately preserving the comfort and health of the indoor environment.
Products Mentioned in This Guide
Frequently Asked Questions
Why does the condensate drain freeze in winter?
When temperatures drop below 0°C, the water collected by the dehumidifier solidifies inside the external hose, creating a blockage.
What is the simplest way to prevent the drain line from freezing?
Wrap the hose with foam pipe insulation or self‑adhesive insulation to retain heat and block cold air.
How does heat tape protect the condensate drain?
Heat tape or a thermostatically controlled heating cable gently warms the pipe, melting any ice and keeping the water flowing.
Can I winterproof the drain without buying new equipment?
Yes; you can use existing insulation, route the hose away from drafts, and periodically run the dehumidifier to keep water moving.
What signs indicate a frozen condensate drain needs attention?
The dehumidifier shuts off, water backs up near the unit, or you notice ice forming on the exterior hose.